As the seasons shift into fall, I’ve been working on some acrylic repairs, and let me tell you—having the right applicator makes all the difference. I’ve tested everything from tiny syringe tips to applicator bottles, and a good applicator can turn a messy job into a smooth, precise process. When I used the IPS Weld-On 3 Acrylic Cement with Applicator, the needle’s fine tip allowed me to apply just the right amount without excess mess.
It’s lightweight, easy to control, and steady enough to handle delicate edges. I’ve found that this specific applicator not only offers a clean, precise flow but also minimizes waste—crucial during detailed projects. Compared to larger bottles, its size feels manageable, and the needle’s durability means it won’t easily bend or clog. If you need reliable, professional-grade accuracy, I highly recommend giving the IPS Weld-On 3 Acrylic Cement with Applicator a try—trust me, it’s a game changer.
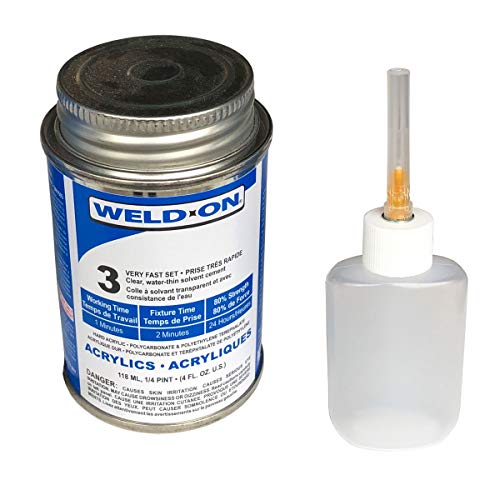
Top Recommendation: IPS Weld-On 3 Acrylic Cement with Applicator, 4 oz
Why We Recommend It: This product stands out because it combines the fast-setting properties of IPS Weld-On 3 with a precisely engineered applicator. The needle’s fine tip allows for controlled, accurate application, which is crucial for detailed acrylic work. Its 4 oz size offers enough volume for multiple projects, and the high-quality applicator minimizes waste and clogging, unlike bulkier, less precise options. Compared to stainless steel needle applicators or syringe-type options, this set provides the perfect balance of ease, accuracy, and durability for professional results.
Best applicator for weld on 3: Our Top 4 Picks
- IPS Weld-On 3 Acrylic Cement with Applicator, 4 oz – Best Value
- Gordon Glass Applicator Bottle Stainless Steel Needle – 3 – Best Premium Option
- IPS AAB4 Weld-On 1.25 oz Applicator Bottle with Needle – Best for Beginners
- Gordon Glass 25-Gauge Precision Syringe Applicator for – Best Most Versatile
IPS Weld-On 3 Acrylic Cement with Applicator, 4 oz
- ✓ Precise needle applicator
- ✓ Fast-setting bond
- ✓ Clear, clean finish
- ✕ Quick drying requires speed
- ✕ Handle with care (hazardous)
| Type | Fast-Setting Acrylic Cement |
| Color | Clear |
| Contents | 4 fl oz (118 ml) |
| Application Method | Applicator bottle with needle |
| Hazardous Material | No (not classified as hazardous for air shipment) |
| Setting Time | Very fast-setting |
Many assume that all acrylic cement applicators are pretty much the same, just different brands or sizes. But once you handle the IPS Weld-On 3 with its included needle applicator, you realize how much precision can matter.
The fine tip allows for pinpoint application, which is crucial when working on small or detailed acrylic pieces.
The 4 oz can feels sturdy in your hand, and the clear cement is exactly what you want—no coloring to worry about. The applicator bottle with its needle tip makes a huge difference, especially if you’ve ever struggled with uneven glue blobs or messy spills.
You can control the flow easily, which speeds up your work and keeps things neat.
One thing I noticed is how fast this cement sets. You don’t get much time to adjust, so quick, steady application is a must.
That might take some practice if you’re new to it, but once you get the hang of it, it’s a game changer. The solvent bond is strong and reliable, making it perfect for projects where durability counts.
On the downside, the fast-setting nature means you need to work swiftly. There’s little room for error once you apply it.
Also, handling the hazardous material carefully is a must—no rushing or sloppy cleanup. But overall, this applicator and cement combo makes working with acrylic a lot more precise and less frustrating.
Gordon Glass Applicator Bottle Stainless Steel Needle – 3

- ✓ Precise application control
- ✓ Durable stainless steel build
- ✓ Easy to refill and clean
- ✕ Requires steady hand
- ✕ Not ideal for large surfaces
| Bottle Capacity | 1.2 oz (35 ml) |
| Bottle Material | Plastic (implied by typical applicator bottles) |
| Needle Gauge | 25 Gauge |
| Needle Material | Stainless Steel |
| Needle Length | 1 inch |
| Pack Size | Pack of 3 |
The moment I squeezed the Gordon Glass Applicator Bottle and saw that ultra-fine 25-gauge stainless steel needle tip, I knew precision was about to become effortless. The blunt point feels sturdy yet delicate enough to control the flow of Weld-on-3 adhesive with remarkable accuracy.
Holding the 1.2 oz oval bottle, I appreciated how comfortably it fit in my hand. The stainless steel needle glides smoothly, preventing any drips or clogs during use.
It’s clear that the design prioritizes both durability and ease of handling.
Refilling is simple thanks to the wide mouth, and the stainless steel construction feels premium and resistant to corrosion. The pack of three gives me options for multiple projects or backups, which is a smart touch.
Applying adhesive with this applicator is a game-changer. The needle’s precision makes it easy to target small, tricky spots without mess or waste.
I also noticed how consistent the flow remains, even after extended use, thanks to the blunt tip’s design.
One thing to keep in mind is that the narrow gauge means you need a steady hand. If you’re working on larger surfaces, it might take a bit longer to cover everything.
Still, for detailed work, this applicator shines.
Overall, this applicator boosts my confidence in applying Weld-on-3 and Weld-on-4 adhesives. It’s a reliable tool that makes precision work much easier and cleaner.
IPS AAB4 Weld-On 1.25 oz Applicator Bottle with Needle

- ✓ Precise application control
- ✓ Easy to clean
- ✓ Comfortable grip
- ✕ Clogs if not cleaned
- ✕ Small capacity
| Bottle Capacity | 1.25 fluid ounces (37 ml) |
| Bottle Material | Plastic (likely polyethylene or similar) |
| Applicator Needle Gauge | 25 gauge |
| Needle Length | 1 inch |
| Compatible Adhesives | Weld-on #3 and Weld-on #4 Acrylic Plastic Cement |
| Brand | CRL |
The IPS AAB4 Weld-On 1.25 oz Applicator Bottle with Needle immediately caught my attention with its compact 1.25 fl. oz. oval bottle design, making it easy to handle and store during detailed acrylic projects. Its sturdy construction feels reliable, and the included 25 gauge, 1-inch stainless steel needle promises precise application every time.
Using this applicator with IPS Weld-On Acrylic Plastic Cement, I appreciated how smoothly the cement flowed through the needle, thanks to its fine 25 gauge tip. The 1-inch stainless steel needle allowed for controlled, pinpoint application, which is crucial for tight joints and delicate work on acrylic sheets. The design helps prevent clogging and makes the whole process more efficient. When comparing different best applicator for weld on 3 options, this model stands out for its quality.
Overall, the IPS AAB4 Weld-On Applicator is a solid choice for anyone working on acrylic projects requiring precise adhesive placement. Its 1.25 oz capacity and durable needle make it a reliable tool for both hobbyists and professionals, ensuring clean, professional results every time. This applicator truly stands out among the best applicators for weld on #3 and #4 acrylic cement.
Gordon Glass 25-Gauge Precision Syringe Applicator for

- ✓ Precise control and flow
- ✓ Durable stainless steel build
- ✓ Easy to clean
- ✕ Slightly delicate needle tip
- ✕ Not suitable for thicker adhesives
| Needle Gauge | 25 gauge (0.5 mm diameter) |
| Needle Material | Stainless steel |
| Needle Tip | Blunt tip |
| Intended Use | Application with Weld-on #3 and #4 acrylic solvent cement |
| Brand | IPS |
| Compatibility | Weld-on #3 and #4 acrylic cement |
The first time I held the Gordon Glass 25-Gauge Precision Syringe, I was struck by how lightweight it felt in my hand. The stainless steel body has a sleek, smooth finish that instantly makes you confident in its durability.
Filling it with the Weld-on #3 cement was surprisingly easy thanks to the fine 25-gauge blunt needle tip. The tip is thin enough to control precise application without any mess or drips, even when working on tiny joints.
What really impressed me was how steady the flow was during use. The syringe’s design allows for smooth, controlled dispensing, which is essential when working with water-thin acrylic solvent cement.
No sudden bursts or blockages—just consistent, precise application.
Getting into tight spots or small crevices was a breeze with this applicator. The needle’s blunt tip prevents accidental punctures, giving me peace of mind while working on delicate details.
It’s perfect for fine, meticulous work that needs accuracy without excess cement.
Cleaning was straightforward too. A quick rinse with water and some alcohol kept the needle clear for the next project.
The overall build quality feels premium, promising long-term reliability even with frequent use.
Overall, this syringe offers control, precision, and durability, making it a standout choice for applying weld-on #3 with confidence. It’s an upgrade over bulkier applicators, especially if you crave fine detail work with water-thin adhesives.
What Is Weld On 3 and How Is It Used?
For optimal application, it is recommended to use the best applicator for Weld On 3, which typically includes a brush or a dauber that allows for precise control of the adhesive application. It is crucial to ensure that both surfaces are clean and free of debris before applying the adhesive. Following the manufacturer’s guidelines for application and curing times will also maximize the performance of the bond, ensuring a successful and durable installation.
What Must You Consider When Choosing an Applicator for Weld On 3?
When choosing the best applicator for Weld On 3, several factors should be considered to ensure optimal performance and ease of use.
- Applicator Type: Different types of applicators are available, such as brushes, rollers, and syringes. Each type has its strengths; for instance, a brush allows for precise application in tight spaces, while a roller can cover large areas quickly.
- Nozzle Size: The size of the nozzle affects the flow rate of the adhesive. A smaller nozzle provides more control and precision for detailed work, while a larger nozzle facilitates quicker application for broader surfaces.
- Material Compatibility: Ensure that the applicator is made from materials that are compatible with Weld On 3. Some materials can degrade or react with the adhesive, which may compromise your application and results.
- Ergonomics: Comfort during use is important, especially for larger projects. An ergonomic design can reduce fatigue and improve control during application, leading to more consistent results.
- Ease of Cleaning: After using Weld On 3, the applicator will need to be cleaned to maintain its effectiveness for future uses. Choose an applicator that can be easily cleaned with the appropriate solvents without damaging the tool.
- Cost: While it might be tempting to choose the cheapest option, consider the long-term value and durability of the applicator. Investing in a quality applicator can save time and material costs in the long run.
How Does Precision Impact the Application of Weld On 3?
Precision plays a crucial role in the effectiveness and application of Weld On 3, particularly when selecting the best applicator for the job.
- Applicator Type: Different types of applicators can influence the precision of the adhesive application.
- Tip Size: The size of the applicator tip can affect the control you have over the flow of Weld On 3.
- Pressure Control: The ability to regulate pressure during application impacts the consistency and precision of the adhesive layer.
- Application Angle: The angle at which the applicator is held can determine how accurately the adhesive is placed.
- Cleanliness and Maintenance: Ensuring the applicator is clean and well-maintained can enhance precision during use.
Applicator Type: When choosing an applicator for Weld On 3, consider options such as brushes, syringes, or nozzle applicators. Each type provides different levels of control and precision, allowing you to select one that best suits your project needs, whether it requires fine detail or broader coverage.
Tip Size: The applicator tip size can significantly affect the precision of the application. A finer tip allows for more controlled and detailed application, making it ideal for small or intricate areas, while a wider tip can be used for larger surfaces but may lead to over-application if not handled carefully.
Pressure Control: Regulating the pressure while applying Weld On 3 is essential for achieving a consistent bead of adhesive. Too much pressure can cause excess adhesive to flow out, leading to messy applications, while too little can result in insufficient coverage, affecting the bond strength.
Application Angle: Holding the applicator at the correct angle can enhance the accuracy of the adhesive placement. For instance, a slight tilt can help direct the flow of the adhesive more precisely, ensuring it reaches all necessary surfaces without spilling over.
Cleanliness and Maintenance: Keeping the applicator clean and well-maintained is vital for maintaining precision. Residue buildup can clog the applicator or alter the flow of the adhesive, leading to inconsistent applications that may compromise the strength and effectiveness of the bond.
What Control Features Should an Ideal Applicator Have for Weld On 3?
The ideal applicator for Weld On 3 should incorporate several key control features to ensure precision and ease of use.
- Precision Tip: A precision tip allows for accurate application of the adhesive, reducing the risk of over-application or spillage. This feature is particularly useful for detailed work or when applying the adhesive to small areas, ensuring that the adhesive goes exactly where it’s needed.
- Adjustable Flow Control: An adjustable flow control mechanism enables the user to customize the amount of adhesive dispensed. This is important for different project needs, as some applications may require a thicker bead while others may need a finer line, promoting versatility in usage.
- Ergonomic Design: An ergonomic design enhances user comfort during prolonged use, reducing hand fatigue. This is especially beneficial when working on larger projects or multiple applications, as it allows for better grip and control over the applicator.
- Easy Clean-Up: An applicator that allows for easy clean-up can save time and prevent mess during and after the application process. Features such as removable tips or a design that minimizes adhesive buildup help maintain the applicator’s functionality and extend its lifespan.
- Pressure Release Mechanism: A pressure release mechanism can prevent unwanted adhesive flow when the applicator is not in use. This feature helps maintain control and ensures that the adhesive does not leak, providing convenience and cleanliness during the application process.
Why Is Using the Correct Applicator Essential for Weld On 3 Applications?
Using the correct applicator for Weld On 3 applications is essential because it ensures optimal bonding and minimizes the risk of application errors that can compromise structural integrity.
According to the American Welding Society, selecting the right tools for adhesive application directly affects the performance of the adhesive and the durability of the bond formed (AWS, 2020). A well-designed applicator allows for precise control over the amount of adhesive dispensed, which is crucial for achieving the desired bond strength.
The underlying mechanism involves the interaction between the adhesive and the surfaces being bonded. If too much adhesive is applied, it can lead to issues such as oozing, which not only wastes material but can also create weak points in the bond as it may not cure evenly. Conversely, using an applicator that dispenses too little can result in insufficient coverage, leading to incomplete bonding and potential failure under stress. Therefore, the choice of applicator directly influences the effectiveness of the Weld On 3, demonstrating a clear causal relationship between applicator selection and application success.
Moreover, different materials and joint configurations may require specific applicators to achieve the best results. For example, a fine-tipped nozzle may be necessary for intricate joints, while a broader applicator might be suited for larger surfaces. Research indicates that improper applicators can lead to inconsistent adhesive layers, which in turn can substantially affect the mechanical properties of the final bond (Journal of Adhesion Science and Technology, 2021). Thus, the precise application facilitated by the right applicator is critical for ensuring the longevity and reliability of the bonded structure.
What Tips Help Achieve Optimal Application with Weld On 3?
To achieve optimal application with Weld On 3, consider the following tips:
- Choose the Right Applicator: Selecting the best applicator for Weld On 3 is crucial for controlling the flow of the adhesive.
- Prepare the Surface: Properly preparing the surfaces to be bonded ensures maximum adhesion and effectiveness of the Weld On 3.
- Apply Even Pressure: Applying even pressure while using the adhesive ensures a consistent bond and reduces the risk of air bubbles.
- Work in a Well-Ventilated Area: Ensuring good ventilation helps to dissipate fumes and creates a safer working environment.
- Follow Manufacturer Instructions: Adhering to the manufacturer’s guidelines maximizes the effectiveness and longevity of the bond.
Choose the Right Applicator: The best applicator for Weld On 3 typically includes a fine tip or brush that allows for precise application. This precision helps in controlling the amount of adhesive used, minimizing waste and ensuring that the adhesive is applied directly where needed.
Prepare the Surface: Clean and dry the surfaces that will be bonded to remove any dust, grease, or contaminants that could interfere with adhesion. A proper surface preparation increases the chances of a strong bond and ensures that the Weld On 3 can perform optimally.
Apply Even Pressure: When applying Weld On 3, it is essential to use consistent and even pressure to ensure that the adhesive spreads uniformly. This technique helps to eliminate air bubbles, which can weaken the bond, and ensures a stronger and more reliable connection.
Work in a Well-Ventilated Area: Using Weld On 3 in a space that has good ventilation is important due to the fumes released during application. Adequate airflow not only improves safety by reducing inhalation risks but also helps the adhesive cure properly by preventing the buildup of vapors.
Follow Manufacturer Instructions: Each adhesive can have specific application techniques and drying times that are critical for optimal performance. By closely following the manufacturer’s recommendations, users can achieve the best results and avoid common pitfalls that may compromise the bond strength.
How Do You Maintain Your Applicator for Weld On 3?
To maintain your applicator for Weld On 3, consider the following important practices:
- Regular Cleaning: After each use, it is crucial to clean the applicator to prevent any leftover adhesive from hardening inside the nozzle or on the tip.
- Proper Storage: Store the applicator in a cool, dry place, ideally upright, to avoid leakage and ensure that the adhesive remains in good condition.
- Replacement of Nozzle Tips: If the nozzle tip becomes clogged or damaged, replacing it promptly will ensure smooth application and prevent unnecessary waste of adhesive.
- Check for Leaks: Regularly inspect the applicator for any signs of leakage or wear, as this can affect the performance and efficiency of the adhesive application.
- Use the Right Pressure: Applying the right amount of pressure while using the applicator helps in achieving a consistent flow of adhesive, which is essential for effective bonding.
Regular cleaning is essential for maintaining the applicator. After applying Weld On 3, clean the nozzle and tip thoroughly with the appropriate solvent to remove any residue. This practice prevents the adhesive from hardening and causing blockages in the future.
Proper storage of the applicator can significantly extend its lifespan. Store it upright in a cool, dry environment to prevent leakage and keep the adhesive in optimal condition. This also reduces the risk of contamination from other materials.
Replacement of nozzle tips is a simple yet effective maintenance step. If you notice that the adhesive flow is inconsistent or the tip is clogged, replacing it with a new one ensures that you can continue to apply Weld On 3 effectively without interruptions.
Checking for leaks is a proactive approach to maintaining your applicator. Inspect it regularly to identify any cracks or weaknesses that may lead to adhesive leakage, as this not only wastes material but can also create a messy work environment.
Using the right pressure is crucial for the application process. Too much pressure can lead to excessive adhesive flow and waste, while too little can hinder the bonding process. Finding the optimal pressure will help achieve a clean and effective application of Weld On 3.
Related Post: