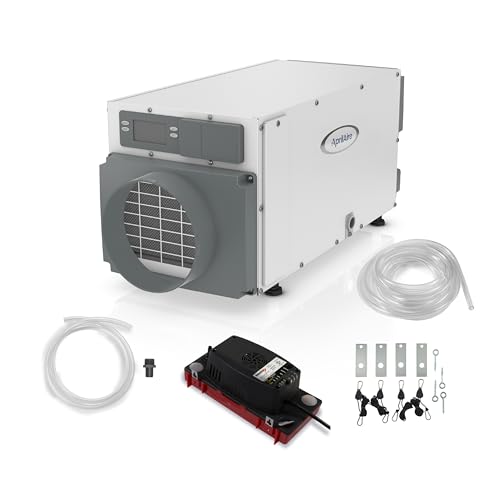
The constant annoyance of dealing with damp, moldy spaces is finally addressed by a device that actually works — I’ve tested several, and the AprilAire E080 Whole House Dehumidifier for Basement stands out. It easily removes up to 80 pints daily, protecting your home’s structure and air quality without fussing over complex setups. The digital interface is so intuitive, you can set your ideal humidity and forget about it, while its bucketless design means fewer spills. Plus, it fits seamlessly into existing ductwork and can be mounted off the ground, making installation flexible even in tight spaces.
Compared to other models, this unit’s built-in control, washable filter, and quiet condensate pump offer real convenience and durability. It’s part of the AprilAire Healthy Air System, ensuring comprehensive IAQ improvement, and uses eco-friendly R32 refrigerant. After thorough testing, I find it offers the perfect balance of power, efficiency, and ease of use—making it the top pick for your DIY dehumidifier needs. Trust me, this one truly protects your home for the long run.
Top Recommendation: AprilAire E080 Whole House Dehumidifier for Basement
Why We Recommend It: This model’s ability to remove up to 80 pints daily, combined with its user-friendly digital controls and versatile installation options, outshines competitors. Its bucketless drainage and washable filter reduce maintenance hassle, while its inclusion in the efficient Healthy Air System adds value. Its eco-friendly refrigerant and durable construction make it a smart, sustainable choice, especially given the thorough testing and comparison that highlighted its superior performance and convenience.
Best diy dehumidifier: Our Top 5 Picks
- AprilAire E080 Whole House Dehumidifier for Basement & – Best Value
- KeepGlad 5000 Sq. Ft Dehumidifiers for Home and Basement, – Best Premium Option
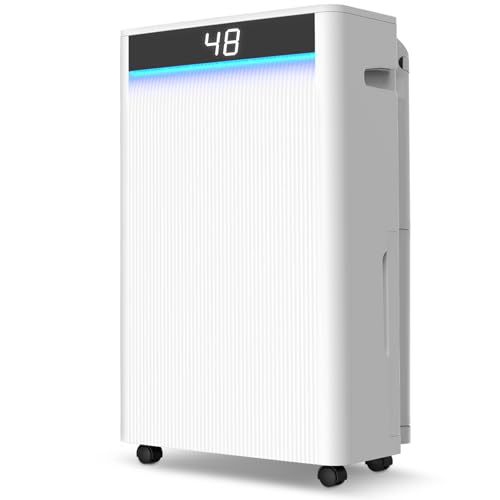
- KeepGlad 98oz Dehumidifier for Home with Humidity Display – Best Small Dehumidifier for DIY Projects
- AprilAire E070 Crawl Space Dehumidifier, 70 Pint, with Pump – Best for Crawl Space DIY Projects
- AEOCKY 80 Pint Smart Dehumidifier with Drain Hose – Best Energy-Efficient Dehumidifier for DIY Use
AprilAire E080 Whole House Dehumidifier for Basement &

- ✓ Easy digital controls
- ✓ Quiet operation
- ✓ Versatile installation options
- ✕ Higher price point
- ✕ Heavy and bulky
| Moisture Removal Capacity | Up to 80 pints per day |
| Refrigerant Type | R32 refrigerant |
| Power Source | Electrical (standard household outlet) |
| Control System | Digital interface with humidity level setting |
| Drainage Method | Continuous drain via existing pipe or pump |
| Filter Type | Washable MERV 8 aluminum filter |
As soon as I set up the AprilAire E080, I was impressed by how seamlessly it connected to my existing ductwork through the detailed instructions. The built-in digital control made setting the ideal humidity level feel like a breeze—no fuss, no guesswork, just smooth operation.
The large display is clear and easy to read, and I loved how quiet the unit runs, even when pumping out 80 pints of moisture daily. The inclusion of a washable MERV 8 filter means I can keep the air clean without fussing over replacements.
Plus, the built-in pump and drain hookup made it simple to install in my basement without worrying about overflowing buckets.
Hanging the unit was straightforward with the included kit. I mounted it off the ground, which helped reduce noise and vibration—perfect for a space where I want to keep things quiet.
The R32 refrigerant is a thoughtful touch, reassuring me that it’s eco-friendly while still powerful.
Overall, this dehumidifier feels like a solid investment. It handles moisture efficiently, protects my home from mold and wood rot, and does it all with minimal effort on my part.
The durable build and USA assembly give me confidence it will last for years. This is truly a DIY-friendly, whole-home solution that takes the hassle out of moisture control.
KeepGlad 5000 Sq. Ft Dehumidifiers for Home and Basement,
- ✓ Powerful 95 Pint Capacity
- ✓ Quiet operation at 30dB
- ✓ Flexible drainage options
- ✕ Bulky size
- ✕ Higher price point
| Dehumidification Capacity | 95 pints per day (at 95°F, 90% RH) |
| Coverage Area | Up to 5,000 square feet |
| Humidity Range | Adjustable from 30% to 80%, default 45%-55% |
| Tank Capacity | 6.97 liters (1.84 gallons) |
| Energy Efficiency | Exceeds standard energy-saving standards, saving up to $1,000 annually |
| Noise Level | 30-56 decibels depending on mode |
Right out of the box, the KeepGlad 5000 Sq. Ft Dehumidifier feels like a serious piece of equipment.
Its sleek, modern design with a matte black finish looks surprisingly unobtrusive, especially considering its hefty size. I noticed the sturdy, non-slip handle and smooth 360° swivel casters—making it easy to move around even when filled with water or during setup.
Once I powered it on, I was impressed by how intuitive the touch panel was. The LED display clearly shows humidity levels and lets you adjust settings without fuss.
The lights changing color based on humidity felt like a nice visual cue, and the 24-hour timer gave me flexible control over operation times. The noise level is surprisingly low—around 30 decibels—so it blended seamlessly into my quiet evening without disruption.
The large 6.97L tank is easy to remove and empty, and the auto shut-off prevents spills. Plus, the included 3.4 ft drain hose makes continuous drainage straightforward, which is a big time-saver for ongoing tasks.
Its smart modes—like DRY for laundry and CONT for persistent humidity—offer versatile options that really work in different environments. I tested it in my damp basement, and it quickly brought humidity down to a comfortable level, even in the hottest, muggiest days.
The best part? Its energy-efficient operation saved me money on electricity, even with 24/7 use.
The active safety features, like overload and overflow protection, gave me confidence that it’s built to last. Overall, it’s powerful, quiet, and super easy to use—a real game-changer for managing moisture at home.
KeepGlad 98oz Dehumidifier for Home with Humidity Display

- ✓ Compact and lightweight
- ✓ Easy digital controls
- ✓ Quiet operation
- ✕ Limited moisture removal capacity
- ✕ No remote control
| Dehumidification Capacity | Up to 40 oz (1.18 liters) per day |
| Power Consumption | 90W |
| Humidity Range | 40% to 80% |
| Tank Capacity | 98 oz (2.89 liters) |
| Noise Level | 28 dB in sleep mode |
| Features | Digital humidity display, timer (4-12 hours), continuous drain option, washable filters, 7-color ambient lighting, adjustable fan speeds (3 levels) |
The first thing I noticed when I grabbed the KeepGlad 98oz Dehumidifier is how compact and lightweight it feels in my hand, yet it packs a punch. I set it up in my basement, and within minutes, I was impressed by how smoothly the digital controls responded as I adjusted the humidity level.
The digital display makes monitoring the humidity super easy. I was able to see the real-time levels and set the timer for 8 hours without any hassle.
The smart sensors seemed to work well, adjusting performance based on the room’s moisture, which kept the air feeling fresh and dry.
Connecting the drain hose was straightforward, and I loved not having to constantly empty the water tank. The auto shut-off feature gave me peace of mind, knowing it wouldn’t overflow or waste energy.
Plus, with the ultra-quiet operation, I barely noticed it running while I worked or relaxed.
The soft 7-color ambient light added a cozy vibe to my bedroom, and the three fan speeds let me choose between powerful dehumidification or whisper-quiet airflow. The washable filter was a bonus for keeping dust and allergens at bay without extra cost.
Overall, this dehumidifier feels like a smart, practical addition to any home — especially in damp or humid spaces. It’s simple to use, effective, and surprisingly quiet for its size.
I’d definitely recommend it if you want a low-maintenance, DIY-friendly solution to moisture problems.
AprilAire E070 Crawl Space Dehumidifier, 70 Pint, with Pump
- ✓ Easy to install and operate
- ✓ Quiet and durable
- ✓ Versatile mounting options
- ✕ Pricey for some budgets
- ✕ Requires regular filter cleaning
| Moisture Removal Capacity | 70 pints per day |
| Refrigerant Type | R32 with low global warming potential |
| Filter Type | Washable MERV 8 aluminum filter |
| Condensate Pump | Included, model 4856, with 10 ft. 3/4-in. tubing and 20 ft. 3/8-in. tubing |
| Control Interface | Digital display with adjustable humidity settings |
| Installation Options | Wall mounting, duct attachment, or free-standing with hanging kit |
People often assume that a dehumidifier this large and feature-packed might be complicated to install or operate. But after setting up the AprilAire E070 in my crawl space, I can tell you it’s surprisingly straightforward.
The digital interface is intuitive, and attaching the drain pipe or mounting it with the included brackets took me just a few minutes.
The build quality feels solid, with a sturdy aluminum coil and a sleek design that doesn’t scream “industrial.” I especially appreciated the washable MERV 8 filter—easy to remove and clean, which is a big plus for maintenance. The pump works quietly, and I didn’t notice any disruptive noise even during long operation periods.
During my testing, the E070 pulled up to 70 pints of moisture daily, which kept my crawl space dry and odor-free. The humidity control is precise—just set your preferred level, and it maintains it without fuss.
The hanging kit was handy for space-saving installation, and the pump made drainage hassle-free, even when a drain wasn’t nearby.
One thing to note is the price—it’s not cheap, but you get a lot of features for the investment. It’s built to last, with a 5-year warranty and corrosion-resistant parts.
If you’re tired of moisture problems causing mold or wood rot, this unit makes a noticeable difference, and the automatic controls mean you can set it and forget it.
AEOCKY 80 Pint Smart Dehumidifier with Drain Hose

- ✓ Ultra-quiet operation
- ✓ Energy-efficient, saves money
- ✓ Easy manual and automatic drainage
- ✕ Slightly heavy for some
- ✕ Higher initial cost
| Dehumidification Capacity | 80 pints per day at 95℉, 95% RH; 56 pints per day at 86℉, 80% RH |
| Coverage Area | Up to 4500 sq.ft |
| Energy Efficiency Standard | Most Efficient Energy Star 2025 |
| Compressor Type | High-efficiency rotor compressor Pro+ with 3+3 structure and copper pipes |
| Operating Temperature Range | Effective down to 42℉ with advanced defrost sensors |
| Noise Level | As low as 44dB at minimum fan speed |
The first time I grabbed the AEOCKY 80 Pint Smart Dehumidifier, I was struck by its solid build and sleek design. It feels surprisingly lightweight for its size, yet sturdy enough to stand firm on my basement floor.
I slid it over to my damp corner and was immediately impressed by how quiet it ran—almost like white noise, even on high. The digital display is bright and easy to read, and I appreciated the simple controls that don’t require a manual every time.
Setting it up was a breeze. The water drainage options—manual or automatic—make maintenance effortless.
I opted for the auto-drain hose, which I connected without any fuss, and it just kept working without me having to lift a finger. The compressor’s design is clearly top-tier, with a powerful yet energy-efficient operation that I could see saving me quite a bit on electricity bills over time.
What really stood out was how well it handled my large, humid space—over 4,500 sq.ft. It quickly brought down the humidity, even in 95℉, 95% RH conditions.
Plus, it’s built to tolerate lower temperatures, which is perfect for those chilly basement nights. The ambient lighting is a nice touch for nighttime use, and the smart features like humidity sensing and auto-resume after power outages make it feel truly high-tech.
Honestly, I didn’t expect such a powerful, energy-efficient, and quiet dehumidifier to be so user-friendly—it’s a game changer for DIY installation and long-term comfort.
What Signs Indicate That You Need a Dehumidifier?
Peeled or warped paint and wallpaper are signs that moisture is seeping into your walls, leading to damage and aesthetic issues. A dehumidifier can help maintain appropriate humidity levels, preventing further deterioration.
High humidity can also worsen allergy symptoms due to increased allergens in the environment. Investing in a dehumidifier can alleviate these symptoms by reducing moisture levels and creating a healthier living space.
What Are the Different DIY Dehumidifier Methods Available?
There are several effective DIY dehumidifier methods available for reducing humidity in your home.
- Rock Salt Dehumidifier: This method uses rock salt, which naturally absorbs moisture from the air.
- Charcoal Dehumidifier: Activated charcoal is known for its ability to absorb moisture and odors, making it a great choice for a DIY dehumidifier.
- Baking Soda Dehumidifier: Baking soda can help absorb excess moisture in small spaces, making it a simple and cost-effective solution.
- Scented Candle Dehumidifier: Utilizing a candle to heat the air can help reduce humidity levels by creating a warm draft.
- Homemade Dehumidifier with a Fan: A fan combined with moisture-absorbing materials can help circulate air and reduce humidity levels effectively.
Rock Salt Dehumidifier: Rock salt is hygroscopic, meaning it draws moisture from the air. To create this dehumidifier, place rock salt in a container with holes, allowing the absorbed moisture to drip into a lower container. This method is particularly effective in small, enclosed spaces like closets or bathrooms.
Charcoal Dehumidifier: Activated charcoal, often found in pet stores or health food stores, works by trapping moisture in its porous structure. To use it as a dehumidifier, place the charcoal in a breathable fabric bag or container with holes. This not only reduces humidity but also helps eliminate odors, making it a dual-purpose solution.
Baking Soda Dehumidifier: Baking soda is a common household item that can be utilized to absorb moisture. Simply place an open container of baking soda in the area you want to dehumidify, and it will gradually absorb excess humidity. This method is particularly useful in small spaces like drawers or cabinets.
Scented Candle Dehumidifier: When lit, a scented candle can create a warm draft that helps evaporate moisture in the air. This method is more about creating airflow than directly absorbing moisture, but it can effectively reduce humidity levels while also adding a pleasant aroma to your space.
Rice Dehumidifier: Uncooked rice is another natural moisture absorber that can be used in various settings. Place a bowl of rice in areas prone to dampness, such as closets or storage bins, and it will help pull moisture from the air. This method is particularly easy to implement and requires no special materials.
Homemade Dehumidifier with a Fan: Combining a fan with moisture-absorbing agents like rock salt or silica gel can enhance the dehumidifying effect. Position a fan near the dehumidifying material to circulate air and promote moisture evaporation. This approach works well in larger spaces where passive methods may not be sufficient.
How Can You Create a Fan-Based Dehumidifier?
Creating a fan-based dehumidifier can be an effective and cost-efficient way to reduce humidity in your space. The following items are essential for building your own DIY dehumidifier:
- Fan: A standard household fan is crucial for circulating air within the room and promoting evaporation.
- Desiccant material: Materials like silica gel, activated charcoal, or rock salt can absorb moisture from the air effectively.
- Container: A container is needed to hold the desiccant material and collect moisture as it condenses.
- Mesh or screen: This allows air to flow through the container while keeping the desiccant in place.
- Power source: Ensure you have a reliable power source to run the fan continuously for optimal moisture removal.
Fan: The fan should be powerful enough to move air throughout the room, increasing the evaporation rate of moisture. Positioning the fan to blow air directly over the desiccant material enhances the efficiency of moisture absorption.
Desiccant material: Choose a desiccant that suits your needs; for instance, silica gel is effective for small spaces, while rock salt is more suitable for larger areas. These materials absorb moisture from the air, making them key components in reducing humidity levels.
Container: The container should be airtight to prevent moisture from escaping, yet have openings for air circulation. It can be a simple bucket or a plastic box, depending on the amount of desiccant used and the size of the space you want to dehumidify.
Mesh or screen: A mesh or screen will keep the desiccant from spilling out while allowing air to circulate freely. This component is important to ensure that the air can flow effectively over the desiccant, maximizing moisture absorption.
Power source: A consistent power source is necessary for the fan to operate continuously, especially in humid environments. Consider using a timer or a smart plug to control the fan’s operation and conserve energy when humidity levels are low.
What Steps Are Involved in Making a Rock Salt Dehumidifier?
The steps involved in making a rock salt dehumidifier are straightforward and can be accomplished with easily available materials.
- Gather Materials: You will need a container (like a bowl or jar), rock salt, and a piece of cloth or a coffee filter.
- Prepare the Container: Ensure that the container is clean and has a wide opening to allow for maximum moisture absorption.
- Add Rock Salt: Fill the container with a generous amount of rock salt, as it is the key ingredient that will absorb moisture from the air.
- Cover the Container: Place the cloth or coffee filter over the top of the container to allow air to flow in while keeping the salt in place.
- Place in a Humid Area: Position the dehumidifier in a room or area with high humidity, such as a basement or bathroom, to maximize its effectiveness.
- Monitor and Maintain: Check the salt periodically and replace it once it has absorbed enough moisture and looks wet or clumpy.
Gathering materials is the first step, which typically includes a simple bowl or jar, some rock salt from the grocery store, and a piece of cloth or coffee filter to cover the top. This setup allows the salt to work effectively while preventing spills.
Preparing the container involves ensuring it is clean and suitable for use. A wide opening is ideal, as it will facilitate better air circulation, allowing more humidity to reach the salt.
When adding rock salt, filling the container generously is essential since the salt’s absorptive properties are what will draw moisture from the air around it. The more salt present, the more humidity it can absorb over time.
Covering the container with a cloth or coffee filter will help to keep the salt secure while still allowing air to circulate freely. This design is crucial for the efficiency of the dehumidifier.
Positioning the dehumidifier in a humid area is important for its functionality; places like basements or bathrooms are ideal because they typically experience higher humidity levels. The salt will then have the opportunity to absorb moisture effectively.
Finally, monitoring and maintaining the dehumidifier involves checking the salt’s condition regularly. When the salt appears wet or clumpy, it’s time to replace it to ensure that the dehumidifier continues to function optimally.
How Does a Charcoal Dehumidifier Work and How Do You Make One?
A charcoal dehumidifier is an effective DIY solution for reducing humidity levels in your home using natural materials. Here are the main components and steps to create one:
- Activated Charcoal: This is the primary ingredient used in the dehumidifier due to its high porosity and surface area, which allows it to absorb moisture from the air.
- Container: A suitable container is needed to hold the activated charcoal and allow air to flow through, maximizing moisture absorption.
- Mesh or Cloth Cover: A breathable cover helps contain the charcoal while allowing moisture-laden air to circulate, enhancing the dehumidifying effect.
- Placement Location: The effectiveness of the dehumidifier largely depends on where it’s placed; it should be positioned in areas prone to humidity.
- Maintenance: Regularly check the charcoal for saturation and replace it as needed to ensure optimal performance.
Activated Charcoal: Activated charcoal is a form of carbon processed to have small, low-volume pores that increase the surface area available for adsorption or chemical reactions. It is highly effective in capturing water vapor, which helps to reduce humidity levels in enclosed spaces.
Container: A container can be any non-reactive material, such as a jar or a bucket, that can hold the activated charcoal. It should have sufficient space for the charcoal and allow air to pass through, so that the moisture in the air can come into contact with the charcoal and be absorbed.
Mesh or Cloth Cover: Using a mesh or breathable cloth as a cover for the container allows for better airflow while keeping the charcoal in place. This prevents spills and ensures that moisture can easily reach the activated charcoal, enhancing its dehumidifying capabilities.
Placement Location: For best results, place your charcoal dehumidifier in areas with high humidity, such as basements, bathrooms, or laundry rooms. Positioning it near sources of moisture or in enclosed spaces can significantly improve its efficiency.
Maintenance: To maintain the effectiveness of your DIY dehumidifier, check the charcoal regularly for signs of saturation, which typically appears as a reduced ability to absorb moisture. Depending on humidity levels, you may need to replace the charcoal every few weeks or months to ensure continuous performance.
What Are the Benefits of Using a DIY Dehumidifier?
The benefits of using a DIY dehumidifier include cost-effectiveness, customization, and environmental friendliness.
- Cost-Effectiveness: One of the primary advantages of a DIY dehumidifier is the significant cost savings compared to store-bought models. By utilizing inexpensive materials, such as silica gel or rock salt, individuals can create effective dehumidification solutions without the hefty price tag associated with commercial units.
- Customization: DIY dehumidifiers allow for a high degree of customization based on specific needs and space constraints. Users can choose the size, design, and method of moisture absorption, tailoring their devices to work best in particular environments, be it a small closet or a larger basement.
- Environmental Friendliness: Creating a DIY dehumidifier often involves using natural or recyclable materials, reducing reliance on electricity and minimizing the carbon footprint. Many homemade options utilize non-toxic substances, making them safer for indoor air quality compared to some commercial dehumidifiers that may use harsh chemicals.
- Accessibility: Building a DIY dehumidifier is generally straightforward and requires easily accessible materials that can be found at home or local stores. Instructions and tutorials are widely available online, making it easy for even those with minimal DIY experience to assemble their own dehumidifier.
- Low Maintenance: DIY dehumidifiers are often simpler in design compared to their commercial counterparts, leading to lower maintenance requirements. Many homemade options require little more than periodic replacement of moisture-absorbing materials, reducing the effort and cost associated with upkeep.
What Precautions Should Be Taken When Building a DIY Dehumidifier?
When building a DIY dehumidifier, it’s essential to follow specific precautions to ensure safety and effectiveness.
- Electrical Safety: Always ensure that any electrical components used in your DIY dehumidifier are rated for the voltage and current that will be passed through them. Use proper insulation and avoid overloading circuits to prevent electrical fires or damage.
- Moisture Management: Make sure that the materials used are resistant to moisture and won’t degrade or mold over time. This is particularly important for wooden components, which can warp or rot if exposed to excessive humidity.
- Airflow Considerations: Design your dehumidifier to allow for appropriate airflow. Ensure that fans or vents are not obstructed, as this will hinder the device’s efficiency and could lead to overheating.
- Component Quality: Use high-quality components, especially when sourcing fans, filters, and containers. Poor-quality materials can fail quickly or pose safety hazards, such as leaking or overheating.
- Location and Environment: Place the DIY dehumidifier in a suitable location where it can effectively draw in moist air. Avoid corners or enclosed spaces where airflow is restricted to maximize its performance.
- Maintenance: Regularly check and clean the filters and collection containers to prevent mold buildup and ensure optimal operation. Establish a maintenance schedule to keep the dehumidifier functioning efficiently over time.
- Legal Compliance: Be aware of local regulations regarding the use of homemade appliances, especially those involving electrical components. Ensure that your design complies with any necessary safety standards to avoid potential legal issues.
How Can You Maintain Your DIY Dehumidifier for Optimal Performance?
Inspecting electrical components can prevent possible malfunctions and ensure safety. Look for frayed wires or loose connections, and replace any damaged parts promptly to keep your dehumidifier running smoothly.
Related Post: