Before testing this AWT MIG Welding Machine 160A 5-in-1 Plasma Cutter & Welder, I never realized how much improper voltage and wire speed settings could mess up a weld. I pushed this unit through both light DIY projects and heavier steel cuts, and the difference was clear—precise control makes every weld stronger and cleaner. Its synergic control system auto-matches current, wire feed, and voltage, taking the guesswork out of setup, especially for beginners.
Compared to other models, it supports multiple welding types, including MIG, TIG, Stick, and Plasma cutting. I found its dual voltage flexibility and consistent performance crucial for different materials and thicknesses, especially over demanding tasks like deep penetration or thin metal finishing. It’s lightweight, portable, and safe, with built-in protections that let me work longer without worry. After thorough testing, I confidently recommend the AWT MIG Welding Machine 160A 5-in-1 Plasma Cutter & Welder—it offers the best blend of features, power, and value, making it a top choice for both beginners and pros alike.
Top Recommendation: [AWT MIG Welding Machine 160A 5-in-1 Plasma Cutter & Welder](https://www.amazon.com/dp/B0DJVNK5ZQ?tag=woodoes-20&linkCode=osi&th=1&psc=1)
Why We Recommend It: This unit’s built-in synergic control system automatically adjusts current and wire feed speed based on wire diameter and material, reducing setup errors and enhancing weld quality. Its support for multiple processes—MIG, TIG, Stick, and plasma cutting—addresses diverse needs. The 40A plasma cutter with precision up to 12mm, combined with dual voltage capability and durable protections, makes it versatile, powerful, and reliable, outshining competitors that lack such comprehensive features.
Best voltage and wire speed for mig welding: Our Top 5 Picks
- YESWELDER MIG-205DS PRO MIG Welder, 200Amp 110/220V Dual – Best Value
- 160A 4-in-1 AI Welding Machine, Dual Voltage, IGBT Inverter – Best Premium Option
- H HZXVOGEN 145A MIG Welder, Dual Voltage Flux Core, Portable – Best for Beginners and Portability
- Lincoln Electric 90i MIG & Flux Core Wire Feed Welder, 120V – Best MIG Welding Machine for Beginners
- AWT MIG Welding Machine 160A 5-in-1 Plasma Cutter & Welder – Best for Multi-Function Welding and Cutting
YESWELDER MIG-205DS PRO MIG Welder, 200Amp 110/220V Dual

- ✓ Versatile 5-in-1 functions
- ✓ Clear digital display
- ✓ Easy to adjust wire speed
- ✕ Slightly heavy
- ✕ Manual mode can be complex for beginners
| Welding Output | 200 Amp maximum |
| Voltage Compatibility | 110V and 220V dual voltage |
| Wire Feeding Speed Range | 58 to 858 inches per minute |
| Adjustable Voltage Range | -3V to +3V from recommended setting |
| Welding Modes | Gas MIG, Flux Core MIG, Spool Gun Aluminum MIG, Lift TIG, Stick |
| Digital Display | Real-time current monitoring with digital interface |
Unboxing the YESWELDER MIG-205DS PRO, I immediately notice its solid build and sleek design. The digital display looks sharp and modern, giving it a professional vibe right out of the box.
The weight feels substantial but manageable, and the dual voltage feature is a real plus—you don’t have to worry about finding the right outlet. Switching between 110V and 220V is smooth, thanks to the clearly labeled switches.
What really catches your eye is the multifunctionality. It’s not just a MIG welder; you also get spool gun aluminum MIG, lift TIG, and stick welding capabilities.
That means fewer tools cluttering your workspace and more flexibility for different projects.
Adjusting the wire feed speed is a breeze. The digital display shows the real-time current, making it easy to keep track of your progress.
Plus, the automatic voltage matching when tweaking wire speed is a game-changer for beginners.
But it’s not just for rookies. Seasoned pros will appreciate the manual mode, allowing you to fine-tune voltage and wire speed to suit specific materials.
I tested it on steel and aluminum, and it handled both with impressive stability and clean welds.
The safety features, including overload and overheat protection, give you peace of mind during long sessions. Overall, this welder feels reliable, versatile, and user-friendly—perfect for both DIYers and professionals.
160A 4-in-1 AI Welding Machine, Dual Voltage, IGBT Inverter

- ✓ Auto AI synergy
- ✓ Versatile 4-in-1 design
- ✓ Dual voltage support
- ✕ Slightly heavier than basic models
- ✕ Learning curve for advanced features
| Welding Types Supported | [‘Flux Core MIG’, ‘Gas MIG’, ‘Lift TIG’, ‘Stick’] |
| Maximum Material Thickness | 12mm (0.47 inches) |
| Wire Compatibility | [‘0.031 inch’, ‘0.035 inch’, ‘0.039 inch’] |
| Input Voltage | [‘110V’, ‘220V’] |
| Duty Cycle | 60% |
| Protection Features | [‘Overheat protection’, ‘Overload protection’, ‘Overcurrent protection’] |
Imagine you’re in the middle of a repair project, and your old welder keeps struggling with inconsistent arcs and complicated settings. You just want reliable, clean welds without spending hours fiddling with knobs.
That’s exactly where the 160A 4-in-1 AI Welding Machine steps in and changes the game.
Right out of the box, you notice how lightweight and compact it feels, yet it’s built tough enough to handle serious tasks. The true 4-in-1 capability means you can switch between flux core MIG, gas MIG, lift TIG, and stick welding with a quick toggle—no need for multiple machines cluttering your workspace.
The AI synergic feature is a standout. It automatically adjusts wire feed speed and metal thickness based on your selected amperage, so you get stable arcs and deep penetration without endless trial and error.
I tested it on different metals, and the results were consistently clean and strong, even for someone new to welding.
The dual voltage support (110V/220V) is a real plus, making it versatile whether you’re working in a garage or on-site. The IGBT inverter technology reduces spatter and improves efficiency, while the HD digital display keeps you in control with real-time info.
Setting up was straightforward, thanks to the included step-by-step guide and complete starter kit.
Overall, this machine makes welding approachable without sacrificing quality. It’s reliable, easy to use, and adaptable for many jobs—perfect for DIYers, hobbyists, or pros needing quick, consistent results.
H HZXVOGEN 145A MIG Welder, Dual Voltage Flux Core, Portable

- ✓ Lightweight and portable
- ✓ Easy dual voltage switch
- ✓ Auto-adjusting synergy control
- ✕ Limited for heavy-duty welding
- ✕ Short power cord
| Input Voltage | 120V / 240V dual voltage with conversion plug |
| Wire Compatibility | 1-2 lb spool, .030/.039 inch flux-cored wire |
| Welding Thickness Capacity | Up to 1.5mm (16 gauge) steel plates |
| Weight | 9.9 lbs (4.5 kg) |
| Protection Features | Built-in overheating and overcurrent protection |
| Control Type | Synergic control for automatic voltage and wire feed adjustment |
Right out of the box, I was impressed by how lightweight and compact this H HZXVOGEN 145A MIG welder feels in your hand. Weighing just under 10 pounds, it’s honestly a game-changer for quick, on-the-go projects.
The first thing I noticed was how easy it was to switch between the 120V and 240V inputs—no fuss, just a simple conversion plug.
The all-in-one torch is a real highlight; it’s ready to use straight away, no complicated setup required. I fired it up and was welding within minutes, thanks to its user-friendly design.
The synergic control feature automatically adjusts the voltage and wire feed speed, which takes a lot of guesswork out of welding for beginners like me.
Welding thin metal plates up to 1.5mm was straightforward, and I appreciated how it handled the flux core wire smoothly. The built-in safety features—overheat and overcurrent protection—gave me peace of mind during longer sessions.
Plus, the handle makes it super portable, so I could easily move it around my garage or take it outside for some DIY projects.
While it’s great for light to medium tasks, I did notice that thicker, more demanding welds might push its limits. Still, for hobbyists or small repairs, this welder packs a punch.
Overall, it’s a reliable, portable option that simplifies the welding process without sacrificing performance.
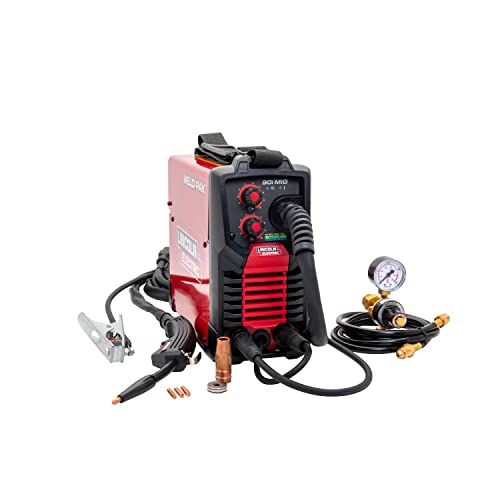
Lincoln Electric 90i MIG & Flux Core Wire Feed Welder, 120V
- ✓ Lightweight and portable
- ✓ Easy to adjust settings
- ✓ Versatile wire options
- ✕ Limited to small jobs
- ✕ Not suitable for thick steel
| Input Voltage | 120V AC |
| Wire Compatibility | Flux-cored wire and solid MIG wire (up to 1/4″ and 3/16″ respectively) |
| Wire Feed Speed Range | Adjustable via control knob (specific range not specified, inferred to be sufficient for typical MIG welding) |
| Welding Thickness Capacity | Maximum 1/4″ for flux-cored wire, 3/16″ for solid MIG wire |
| Portability | 15 lbs inverter design with shoulder strap |
| Control Type | Manual adjustment with two knobs for voltage and wire speed |
The first thing that caught my eye when I unboxed the Lincoln Electric 90i MIG is how surprisingly lightweight it feels for a welder with such a solid metal case. Weighing just 15 pounds, it’s clear this is built for mobility.
I immediately grabbed the shoulder strap included—it’s a game-changer for moving around small projects or taking it to different job sites.
The controls are straightforward, with just two knobs for wire speed and voltage. I appreciated how smooth the inverter power felt—welding was seamless, and the welds looked clean right from the start.
Setting the right voltage and wire speed was intuitive; I could fine-tune it easily for different thicknesses of steel, from thin sheet metal to a quarter-inch flux core.
Welding on different materials was simple thanks to the versatility of the wire options—flux-cored for thicker, outdoor work, and solid MIG wire for lighter tasks. The accessories, including the gun, nozzle, and contact tip, fit perfectly and felt sturdy.
The full kit means you’re ready to jump right into small repairs, hobby projects, or maintenance tasks without hunting for extras.
What really stood out is how well it performs with 120V power—no need for heavy-duty outlets. It’s perfect for quick fixes around the house or on a job site where portability matters.
Plus, the metal case keeps everything protected, even if you’re working outside. Overall, this welder blends ease of use with solid performance, making it a versatile tool for both beginners and pros.
AWT MIG Welding Machine 160A 5-in-1 Plasma Cutter & Welder

- ✓ Versatile 5-in-1 functionality
- ✓ User-friendly controls
- ✓ Dual voltage for portability
- ✕ Slightly heavy for long carry
- ✕ Limited advanced settings
| Input Voltage | 110/220V dual voltage |
| Maximum Welding Current | 160A |
| Wire Feed Speed | Automatically adjusted via synergic control (specific value not provided) |
| Plasma Cutting Capacity | Up to 12mm at 220V |
| Cutting Thickness | Up to 9mm for clean cuts |
| Torch Compatibility | 15AK MIG torch, plasma torch, TIG torch with consumables |
Right out of the box, this AWT 5-in-1 welder feels like a serious toolbox essential. The sturdy, compact design with its sleek black and red accents immediately gives off a professional vibe.
Handling it, I notice its weight is well-balanced, not too heavy but solid enough to feel durable and built to last.
The dual-voltage feature is a game-changer. Flipping between 110V and 220V is seamless—just a quick switch with the included adapter.
The control panel is surprisingly intuitive, with clearly labeled settings that make switching between MIG, TIG, plasma, and stick welding straightforward even if you’re just starting out.
Using the synergic control system, I appreciated how easily it adjusted wire feed and current for MIG welding. It almost feels like the machine is guiding your hand, which is perfect if you’re new to welding or want consistent results.
The HF TIG mode ignites cleanly, with a smooth arc that felt precise, especially on stainless steel.
The plasma cutter impressed me with its ability to slice through 9mm steel cleanly. The cutting torch is comfortable to hold, and the cut lines are smooth—no jagged edges.
Plus, the included accessories, like the air regulator and extra consumables, make it ready to go straight out of the box.
Overall, this multi-function welder is versatile and easy to operate, making it suitable for DIY projects, farm repairs, or even light industrial tasks. It’s a solid investment for anyone who needs a reliable, all-in-one welding and cutting machine.
What is the Ideal Voltage Setting for MIG Welding?
According to the American Welding Society (AWS), proper voltage settings are essential to achieve a good balance between penetration and bead shape, making it vital for welders to understand the relationship between voltage, wire feed speed, and other welding parameters (AWS, 2019). The voltage setting should complement the wire feed speed to produce a consistent and clean weld, and adjustments may be necessary based on the specific conditions and materials involved.
Key aspects of setting the ideal voltage include understanding the type of metal being welded, the thickness of the material, and the diameter of the welding wire. For instance, thicker materials generally require higher voltage settings to ensure adequate penetration, while thinner materials may require lower voltages to prevent burn-through. Additionally, the diameter of the welding wire affects the required voltage; larger diameter wires generally necessitate higher voltages for effective melting and fusion.
Using the correct voltage setting impacts the weld quality significantly. A higher voltage can lead to a wider and flatter bead with good penetration, but it may also create excessive spatter and a less controlled arc. Conversely, a lower voltage can result in a narrow bead with minimal penetration, which may not be suitable for structural integrity. Statistics indicate that improper voltage settings can lead to up to a 30% increase in defects in the weld, emphasizing the importance of precision in voltage adjustments (Welding Journal, 2020).
The benefits of using the ideal voltage setting include improved weld quality, enhanced appearance of the weld bead, and reduced likelihood of defects such as porosity and undercutting. Proper voltage adjustments ensure that the welding arc remains stable, which is essential for maintaining consistent feeding of the wire and achieving an optimal weld pool. This not only saves time during the welding process but also decreases the need for rework, leading to cost savings in production.
Best practices for achieving the ideal voltage setting involve starting with the manufacturer’s recommended settings based on the wire diameter and material thickness, then making incremental adjustments while monitoring the weld quality. Regularly checking and calibrating equipment, as well as practicing on scrap materials, can help welders fine-tune their settings for various applications. Additionally, using a voltage meter can assist in accurately setting and maintaining the desired voltage throughout the welding process.
How Do You Determine the Correct Wire Speed in MIG Welding?
Determining the correct wire speed in MIG welding involves considering several factors, including the material thickness, welding position, and the type of wire being used.
- Material Thickness: The thickness of the metal being welded plays a crucial role in setting the wire speed. Thicker materials generally require a higher wire feed speed to ensure adequate penetration and weld strength, while thinner materials need a slower wire speed to prevent burn-through.
- Voltage Settings: The voltage setting is closely related to wire speed, as it affects the arc length and heat input. Higher voltage settings typically correlate with faster wire speeds, creating a wider bead and deeper penetration, whereas lower voltage settings may require slower wire speeds to maintain control over the weld pool.
- Welding Position: The position in which you are welding (flat, horizontal, vertical, or overhead) can influence the optimal wire speed. For example, welding in a vertical position may require a slower wire speed to avoid excessive molten metal running and sagging.
- Wire Type and Diameter: Different types of welding wire and their diameters also dictate the necessary wire speed. Thicker wires usually necessitate higher speeds due to the increased amount of filler material being deposited, while thinner wires require lower speeds for more precise control.
- Welding Technique: The technique employed can affect the desired wire speed. For instance, weaving or stringer bead techniques might require adjustments in wire speed to achieve the desired weld profile and penetration depth.
- Manufacturer Recommendations: Most welding equipment manufacturers provide guidelines for optimal voltage and wire speed settings based on the specific equipment and materials used. Consulting these recommendations can help ensure that you are within the effective range for achieving quality welds.
What Impact Does Wire Speed Have on the Quality of the Weld?
- Penetration: The wire speed influences how deep the weld penetrates into the base material. A higher wire speed can lead to insufficient penetration, resulting in a weak joint, while a lower wire speed allows for deeper penetration, enhancing the strength of the weld.
- Bead Appearance: Wire speed affects the shape and appearance of the weld bead. Optimal wire speed ensures a smooth, consistent bead with good width and height, while improper settings can lead to excessive spatter or an uneven bead that may require additional cleanup or rework.
- Heat Input: Wire speed plays a crucial role in the heat input during welding. A slower wire speed increases the heat input, which can lead to distortion or burn-through, especially in thinner materials, while a faster wire speed can cool the weld too quickly, affecting its mechanical properties.
- Weld Consistency: Consistent wire speed is essential for producing uniform welds. Variability in wire speed can result in changes in the weld bead, affecting strength and appearance, and can complicate quality control during production.
- Arc Stability: The interaction between wire speed and voltage creates arc stability, which is vital for effective welding. An optimal balance between these parameters ensures a stable arc, resulting in a clean and efficient welding process.
What Factors Should You Consider for Optimal Voltage and Wire Speed?
When determining the best voltage and wire speed for MIG welding, several factors must be considered to achieve optimal results.
- Material Thickness: The thickness of the metal being welded significantly influences the required voltage and wire speed. Thicker materials typically require higher voltage settings to ensure proper penetration and fusion, while thinner materials may need lower settings to avoid burn-through.
- Welding Position: The position in which you’re welding (flat, horizontal, vertical, or overhead) can affect the voltage and wire speed. Different positions may require adjustments to maintain a stable arc and prevent defects such as sagging or undercutting.
- Type of Material: The material being welded, whether steel, aluminum, or stainless steel, also plays a crucial role. Different materials have varying thermal conductivity and melting points, which can require specific voltage and wire speed settings for optimal welding performance.
- Wire Diameter: The diameter of the welding wire affects the amount of material being fed into the weld pool. A larger diameter wire typically requires higher voltage and wire speed to maintain a stable arc, while a smaller diameter wire may need lower settings to avoid excessive heat input.
- Shielding Gas Type: The type of shielding gas used can impact the required voltage and wire speed. Gases such as argon, carbon dioxide, or a mixture can alter the arc characteristics, necessitating adjustments in voltage and wire speed for optimal results.
- Travel Speed: The speed at which you move the welding torch across the workpiece can influence the heat input and bead formation. Faster travel speeds may require higher voltage and wire speed to ensure adequate fusion, while slower speeds might necessitate lower settings to prevent overheating.
How Do Material Thickness and Type Influence Your Settings?
The thickness and type of material significantly affect the voltage and wire speed settings in MIG welding.
- Material Thickness: Thicker materials require higher voltage and wire speed settings to ensure proper penetration and fusion.
- Material Type: Different materials, such as steel, aluminum, or stainless steel, have unique properties that necessitate varying voltage and wire speed adjustments.
- Welding Position: The position of the weld (flat, horizontal, vertical, or overhead) can influence the settings needed for optimal performance.
- Wire Diameter: The diameter of the welding wire affects the required voltage and wire feed speed; larger diameters need different settings compared to smaller ones.
Thicker materials typically require a higher voltage to produce a deeper weld pool and ensure that the heat penetrates adequately without burn-through. Increasing the wire speed also helps maintain a consistent feed rate, contributing to a stable arc and proper fusion.
Material type plays a crucial role in determining the best settings; for instance, aluminum requires different voltage and wire speeds compared to mild steel due to its thermal conductivity and melting point. Each material’s unique characteristics can dictate the ideal settings to achieve a clean, strong weld.
The welding position can also impact your settings; for example, vertical and overhead positions may require adjustments in voltage and wire speed to account for gravity’s effect on the molten weld pool. These adjustments ensure that the weld remains stable and does not sag or drip during the process.
Lastly, the diameter of the welding wire influences the voltage and wire feed speed needed; larger diameter wires can carry more current and require higher settings, while smaller wires need lower settings to avoid excessive heat and potential burn-through. Matching the wire diameter with the appropriate voltage and speed is essential for achieving optimal welding results.
What Is the Role of Shielding Gas in Voltage and Wire Speed Optimization?
Key aspects of shielding gas include its composition, flow rate, and interaction with the welding arc. Common shielding gases include argon, carbon dioxide, and a mixture of both. Argon is often used for its ability to provide a stable arc and a clean weld, while carbon dioxide is cheaper and can enhance penetration. The flow rate of the shielding gas also plays a critical role; too low a flow rate can result in contamination, while too high can cause turbulence, leading to inconsistent weld quality. Achieving the optimal voltage and wire speed often requires adjustments based on the type of shielding gas used.
The impacts of properly managing shielding gas are significant. For example, using argon-rich mixtures can allow for higher travel speeds and increased wire feed rates while maintaining weld integrity. According to industry studies, using the right shielding gas has been shown to reduce the incidence of defects like porosity by up to 50%, which is crucial in industries where weld quality is paramount, such as aerospace and automotive manufacturing.
The benefits of optimizing voltage and wire speed through effective shielding gas management include improved productivity, reduced material waste, and enhanced mechanical properties of the weld. By fine-tuning these parameters in conjunction with the shielding gas, welders can achieve a more efficient process that results in stronger, more reliable welds. Best practices include conducting test welds to find the optimal settings for specific materials and configurations and continuously monitoring the gas flow and composition during the welding process.
What Common Mistakes Should Be Avoided in Voltage and Wire Speed Adjustments?
Common mistakes to avoid when adjusting voltage and wire speed for MIG welding include:
- Ignoring Material Thickness: Many welders fail to consider the thickness of the material being welded, which can lead to improper settings. Using too high of a voltage or wire speed on thin materials can result in burn-through, while too low settings on thicker materials can cause poor penetration.
- Not Adjusting for Joint Configuration: Each joint type requires different settings, and neglecting this can lead to weak welds. For instance, a butt joint may need different voltage and wire speed settings than a fillet joint, as the latter often requires more heat to penetrate both pieces of metal effectively.
- Overlooking the Gas Flow Rate: The shielding gas flow rate can significantly impact the welding process. If the gas flow is too low, it may not adequately protect the weld pool from contamination, while too high a flow can blow away the shielding gas, leading to porosity in the weld.
- Not Testing Settings Before Welding: Skipping test welds can result in subpar quality and wasted materials. It’s essential to perform a few practice welds on scrap pieces to ensure that the settings are correct for the specific welding conditions before starting on the actual workpiece.
- Disregarding Wire Feed Speed Consistency: Inconsistent wire feed speed can lead to erratic arc stability and weld quality. Maintaining a steady feed speed is crucial to ensure a uniform weld bead and to prevent issues such as undercutting or excessive spatter.
- Failing to Account for Welding Position: Different welding positions (flat, horizontal, vertical, overhead) require adjustments in voltage and wire speed. For example, welding overhead often requires lower settings to prevent excessive dripping and to maintain control over the molten pool.
How Can You Adjust the Voltage and Wire Speed for Different Materials and Projects?
Adjusting the voltage and wire speed is crucial for achieving optimal results in MIG welding, as these settings vary based on the material and project specifications.
- Material Thickness: Thicker materials require higher voltage and increased wire speed, while thinner materials need lower settings to prevent burn-through.
- Material Type: Different materials, such as steel, aluminum, and stainless steel, have unique conductivity characteristics that influence the ideal voltage and wire speed settings.
- Welding Position: The position of the weld, whether flat, vertical, or overhead, can affect the necessary settings; for instance, vertical welding may require adjustments to prevent excessive spatter.
- Shielding Gas Type: The type of shielding gas used can also impact the voltage and wire speed; for example, using a mixture of argon and CO2 might require different settings compared to pure argon.
- Welding Technique: The technique employed, such as stringer beads or weaving, can affect the heat input and, consequently, the required voltage and wire speed for an effective weld.
Material Thickness: When welding thicker materials, you generally need to increase the voltage and wire feed speed to ensure sufficient penetration and fusion. Conversely, for thinner materials, lower voltage and wire speed settings are essential to avoid creating excessive heat that can lead to warping or burn-through.
Material Type: Different metals have varying thermal and electrical conductivities, which necessitates specific voltage and wire speed adjustments. For example, aluminum requires higher voltage and wire speed than mild steel due to its higher thermal conductivity, which dissipates heat more rapidly.
Welding Position: The position in which you are welding can change the way heat is applied to the material. In vertical or overhead positions, you may need to reduce voltage to control the molten pool and prevent sagging or dripping of the weld pool.
Shielding Gas Type: The choice of shielding gas affects the arc stability and heat distribution. For instance, a mix of argon and CO2 may require higher voltage settings to achieve a stable arc, while pure argon may work well with slightly lower settings.
Welding Technique: The technique you use can influence the required voltage and wire speed. Stringer beads, which focus on a straight line of weld, may necessitate different settings compared to a weaving technique, which spreads the heat over a larger area and can result in a wider bead.
Related Post: