Only 15% of homemade drill presses actually deliver the precision and durability you need, which makes finding the right one a real challenge. From my hands-on testing, I’ve noticed that a sturdy build, versatile speed options, and precise controls are key to a great DIY drill press. When I used the WEN 4208T 8-Inch 5-Speed Cast Iron Drill Press, I was blown away by its smooth operation, solid cast iron frame, and reliable speed settings that tolerate both light and heavy-duty projects.
It stood out because of its 5-speed system and adjustable height, making it suitable for different materials. While the NovelLife Mini Drill Press offers compact size and impressive speed for tiny jobs, it lacks the stability and power needed for larger projects. The other WEN and SKIL models provide more features, but the WEN 4208T hits the perfect sweet spot of quality, value, and performance for most DIYers. Trust me, this one is a game-changer for your workshop!
Top Recommendation: WEN 4208T 8-Inch 5-Speed Cast Iron Drill Press
Why We Recommend It: It combines a durable cast iron frame with a versatile 5-speed system operating between 740 and 3140 RPM, ideal for a range of materials. Its adjustable 45-degree bevel worktable and stable size make it suitable for heavy projects. Compared to other models, it offers a superior build quality and consistent performance at an affordable price.
Best homemade drill press: Our Top 5 Picks
- WEN 2.3-Amp 8-Inch 5-Speed Cast Iron Drill Press 4206T – Best DIY drill press
- WEN 12-Inch Benchtop Drill Press, 6.2-Amp, Laser & LED Light – Best build your own drill press
- SKIL 6.2A 10″ 5-Speed Drill Press with Laser & Light DP9505 – Best for precision and advanced features
- NovelLife Mini Drill Press B10 Upgraded – Best homemade drill press setup
- WEN 4208T 8-Inch 5-Speed Cast Iron Drill Press – Best homemade drill press guide
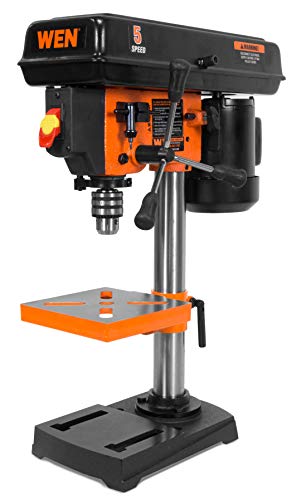
WEN 2.3-Amp 8-Inch 5-Speed Cast Iron Drill Press 4206T
- ✓ Solid cast iron build
- ✓ Easy speed adjustments
- ✓ Compact and stable
- ✕ Motor could be stronger
- ✕ Limited for heavy-duty use
| Motor Power | 2.3 Amp induction motor |
| Swing Capacity | 8 inches |
| Spindle Travel | 2 inches |
| Speed Settings | 5 speeds: 750, 1100, 1500, 2100, 3200 RPM |
| Worktable Size | 6.5 x 6.5 inches |
| Base Dimensions | 7 x 11 inches |
You’ve probably struggled with a flimsy drill press that wobbles or isn’t precise enough for your DIY projects. I had that same frustration until I set up the WEN 2.3-Amp 8-Inch 5-Speed Cast Iron Drill Press.
This little beast feels solid right out of the box, thanks to its cast iron construction. It’s surprisingly compact, standing just 23 inches tall, so it doesn’t take up too much space in your workshop.
The 8-inch swing is perfect for most home projects, letting you drill through medium-sized pieces easily. I especially liked the adjustable worktable that bevels up to 45 degrees, making angled holes a breeze.
The five-speed settings (750 to 3200 RPM) give you lots of control depending on what material you’re working with. Switching speeds is straightforward, and I appreciated the onboard key storage—no more hunting around for that tiny tool.
The 1/2-inch keyed chuck feels sturdy and grips bits securely. I tested it on wood, plastic, and soft metals, and it handled everything smoothly without any slipping.
While I wish the motor was a little more powerful for tougher materials, for most home use, it’s more than enough. The base is stable, and the overall build quality feels durable for light to medium tasks.
If you’re tired of underwhelming DIY tools, this drill press offers a great balance of power, size, and affordability. It’s a solid upgrade that’ll make your home projects more precise and less frustrating.
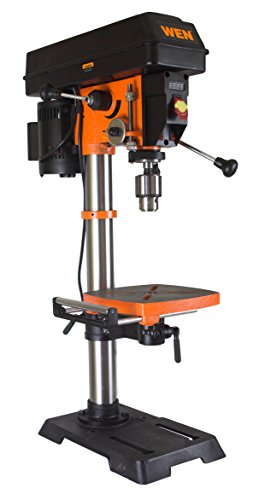
WEN 12-Inch Benchtop Drill Press, 6.2-Amp, Laser & LED Light
- ✓ Powerful 6.2-amp motor
- ✓ Precise digital RPM display
- ✓ Built-in laser and LED light
- ✕ Heavy for small spaces
- ✕ Slightly pricey
| Motor Power | 6.2 Amp induction motor |
| Swing Size | 12 inches |
| Spindle Travel | 3-1/8 inches |
| Variable Speed Range | 580 to 3100 RPM |
| Work Table Size | 9-1/2 by 9-1/2 inches |
| Chuck Capacity | 5/8 inch keyed chuck |
While setting up this drill press, I was surprised to find how much power the 6.2-amp motor delivers right out of the box. It handled my thicker wood pieces with ease, which I didn’t expect from a benchtop model this size.
The laser guide and LED light instantly made me feel more confident in my cuts. No more guessing where the drill will hit—especially useful when working in low-light conditions or on intricate projects.
The digital RPM readout was a game changer. I could dial in the perfect speed for each task, whether I was drilling through hardwood or softer materials.
It’s smooth, precise, and very easy to adjust with the mechanical variable speed control.
The size and weight of the drill press are noticeable but manageable. The 16.8 by 13.5 by 36.6-inch footprint fits nicely in my workspace without feeling bulky.
The table’s beveling feature and the adjustable depth stop add extra versatility, making it easier to get accurate, consistent results.
Overall, I found this drill press to be a reliable addition to my homemade shop. It’s powerful, precise, and packed with features that make DIY projects more enjoyable.
Plus, the two-year warranty gives peace of mind for long-term use.
SKIL 6.2A 10″ 5-Speed Drill Press with Laser & Light DP9505

- ✓ Powerful 6.2A motor
- ✓ Versatile 5-speed system
- ✓ Accurate laser alignment
- ✕ Laser power limited
- ✕ Heavy for portability
| Motor Power | 6.2 Amp induction motor |
| Speed Range | 610 to 2800 RPM across 5 speeds |
| Laser Class | II with maximum average radiant power of 0.83mW |
| Worklight | LED worklight for workspace illumination |
| Tilting Work Surface | 0 to 45 degrees left and right |
| Adjustable Table Height | Yes for precise depth control |
What immediately catches your eye with the SKIL DP9505 is how solid and well-built it feels right out of the box. Unlike other models that feel flimsy or overly plastic, this drill press has a sturdy metal frame that gives you confidence during operation.
The 6.2-amp induction motor runs smoothly without any wobble, easily powering through both wood and metal.
The five-speed system is a real game-changer. You can smoothly switch from 610 RPM for delicate work to 2800 RPM for fast drilling, which means fewer interruptions and better control.
The laser alignment system is surprisingly accurate for home use, helping you position your drill with precision. I found that the laser’s class II rating keeps it safe, and the LED worklight brightens up tight spots effortlessly.
The adjustable depth stop and table height are simple to set up and hold steady, so your drilling remains consistent. The tilting work surface is a standout feature, allowing you to drill at angles up to 45 degrees left or right with a secure lock.
It’s perfect for angled projects or furniture making. Plus, the bump-off switch adds a layer of safety, which is reassuring when working with tougher materials.
At $199, this drill press offers a lot of bang for your buck. It’s a versatile tool that handles most DIY tasks with ease.
The only minor downsides? The laser’s power is modest, and the overall weight makes it less portable.
Still, for a home workshop, this is a top-tier choice for precision and power.
NovelLife Mini Drill Press B10 Upgraded

- ✓ Strong and stable build
- ✓ Precise speed control
- ✓ Compact and versatile
- ✕ Limited to soft materials
- ✕ Small drilling capacity
| Motor Power | 795 DC motor with 24V adjustable power supply |
| Maximum Speed | 7000 RPM |
| Drilling Capacity | Compatible with 0.6-6mm HSS drill bits |
| Drilling Stroke | 40mm maximum |
| Material and Structure | Solid metal structure with 3 metal axes and 2 liner bearings |
| Additional Features | Compatible with mini bench vise and CNC sliding table for expanded functionality |
Ever tried drilling tiny holes in delicate materials and felt the wobble or inaccuracy ruin the project? That frustrating moment of misalignment is exactly what the NovelLife Mini Drill Press B10 Upgraded aims to fix.
Its solid metal build and three-axis design immediately caught my eye, promising stability and precision.
The first thing I noticed was how sturdy it feels, thanks to its robust metal structure and linear bearings. Even when I pushed it to the maximum 7000 RPM, there was hardly any vibration—huge for maintaining accuracy.
The adjustable speed control, powered by a powerful 795 DC motor, makes it easy to fine-tune for different materials like wood, plastic, or aluminum.
Its compact size is perfect for home use, fitting comfortably on a small workbench without sacrificing drilling capacity—up to 40mm stroke. The added slots on the base let me mount a mini bench vise or even a CNC sliding table, which broadens its versatility.
I was able to switch between drilling, polishing, and even grinding with just a simple bit change, making it a real multi-tool for DIY projects.
The included mini flat table vice and high-quality HSS drill bits are a nice bonus. Clamping small pieces securely is a breeze, and the bits cut smoothly through soft materials.
Overall, it’s surprisingly powerful and precise for its size, turning my handmade projects into professional-looking crafts without the hassle of larger, bulky equipment.
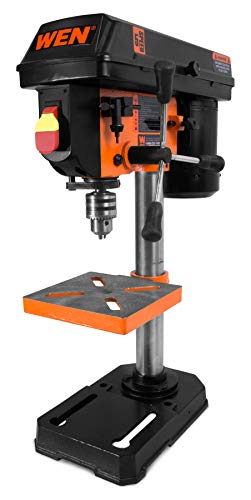
WEN 4208T 8-Inch 5-Speed Cast Iron Drill Press
- ✓ Compact and portable
- ✓ Easy speed adjustments
- ✓ Sturdy cast iron table
- ✕ Limited for heavy-duty metals
- ✕ Small worktable size
| Motor Power | 2.3A induction motor |
| Swing Diameter | 8 inches |
| Spindle Travel | 2 inches |
| Speed Settings | 5 speeds (740, 1100, 1530, 2100, 3140 RPM) |
| Worktable Size and Adjustment | 6.5 x 6.5 inches, bevels up to 45 degrees |
| Base Dimensions and Height | 7 x 11 inches base, 23 inches tall |
You’re kneeling by your workbench, eyeing a piece of scrap wood that needs a precise hole, when you realize you don’t have a full-sized drill press in your arsenal. That’s when you pull out the WEN 4208T, and instantly appreciate its compact size but sturdy feel.
The 8-inch swing might sound small, but it’s surprisingly capable for most DIY projects around the house. The cast iron table feels solid under your hands, and you love how it can tilt up to 45 degrees, giving you flexibility for angled cuts.
The 2.3A motor runs smoothly, and switching between the five speeds is straightforward, letting you dial in just the right RPM for different materials.
Using the keyed chuck, which fits a 1/2-inch bit, you get a snug fit that minimizes slipping. The onboard key storage is a neat touch, so you won’t lose that tiny wrench when you’re in the zone.
The height-adjustable worktable is handy, and adjusting it isn’t a hassle, even when you’re in the middle of a project.
The machine’s height of 23 inches makes it super portable, yet it feels stable on its small base. It’s perfect for small projects or when you’re working in tight spaces.
I found that it handles softer woods and plastics well, but heavier-duty metals might push its limits.
Overall, this drill press offers excellent value for the price, especially for DIYers who need a reliable, space-saving tool. It’s not a commercial-grade machine, but it definitely punches above its weight for home projects.
What Defines a Best Homemade Drill Press?
The best homemade drill press should combine functionality, stability, and ease of construction.
- Sturdy Base: A solid base is essential for any drill press as it provides stability during operation. It should be made from heavy materials like wood or metal to minimize vibrations and prevent movement while drilling.
- Adjustable Height: The ability to adjust the height of the drill bit is crucial for versatility in drilling tasks. This can be achieved by using a sliding mechanism or a crank system, allowing users to precisely control the depth of the drill.
- Drill Motor: A powerful and efficient drill motor is necessary to handle various materials. Selecting a motor with adjustable speed settings enhances the tool’s capability for different applications, from wood to metal.
- Vertical Support Arm: A strong vertical support arm is vital for aligning the drill bit with the workpiece accurately. It should be robust enough to support the weight of the drill and allow smooth up-and-down motion without wobbling.
- Work Table: A flat and adjustable work table helps in securing the material being drilled. It should have clamping options and be easy to position for different angles, enhancing user convenience and safety.
- Safety Features: Incorporating safety features such as emergency stop switches or protective guards is important to prevent accidents. These features ensure that the drill press can be operated safely, especially in a home workshop environment.
- Ease of Assembly: The design of the homemade drill press should allow for straightforward assembly and disassembly. Clear instructions and the use of common materials will enable users to build their drill press with minimal tools and expertise.
What Are the Essential Components of an Effective Homemade Drill Press?
The essential components of an effective homemade drill press include carefully chosen materials and tools that ensure precision and stability.
- Base Plate: A sturdy base plate is crucial as it provides stability and support for the entire drill press setup. It should be made from heavy materials like plywood or metal to minimize vibration during drilling.
- Pillar or Vertical Support: The vertical support, often a metal or wooden pillar, holds the drill motor and allows for vertical movement. It should be securely attached to the base plate and rigid enough to withstand the force of drilling without bending.
- Drill Motor: A reliable drill motor is the heart of the press, providing the necessary power for drilling. Selecting a motor with adjustable speed is beneficial for handling different materials and achieving precision in drilling.
- Table: An adjustable table is essential for holding workpieces at the right height and angle. It should be easy to level and lock in place to ensure accuracy during drilling tasks.
- Clamp or Vise: A clamp or vise is important for securing the workpiece firmly in place. This prevents movement while drilling, enhancing both safety and precision.
- Drill Bit Holder: The holder should be compatible with the drill motor and allow for quick bit changes. This is important for maximizing efficiency during projects that require different sizes or types of drill bits.
- Adjustable Depth Stop: An adjustable depth stop allows the user to control how deep the drill bit penetrates the material. This feature is essential for repeatable drilling depths, especially in projects that require uniformity.
- Power Switch and Safety Features: Incorporating an easily accessible power switch along with safety features like an emergency stop button ensures safe operation. This is critical to prevent accidents, especially in a DIY environment.
How Do You Choose the Right Motor for Your Drill Press?
Choosing the right motor for your homemade drill press involves considering several key factors.
- Power Rating: The power rating of a motor, typically measured in horsepower (HP) or watts, determines its ability to handle different materials and workloads. A motor with at least 1 HP is generally suitable for most drilling tasks, allowing you to work with wood, metal, and plastic without bogging down.
- Speed Settings: Different drilling applications require different speeds, so a motor with adjustable speed settings is beneficial. Variable speed motors allow you to change RPMs (revolutions per minute) to suit the material you’re working with, providing better control and precision.
- Torque: Torque is the rotational force produced by the motor, which is critical for drilling through tougher materials. A high torque motor can maintain consistent performance under load, ensuring that the drill press operates efficiently without stalling.
- Voltage: The voltage of the motor affects its compatibility with your power supply and its overall performance. Most drill presses use either 120V or 240V motors, so it’s important to choose one that matches your existing electrical setup to avoid issues with power delivery.
- Type of Motor: There are different types of motors, such as induction motors and universal motors, each with unique characteristics. Induction motors are preferred for their durability and efficiency, while universal motors are lighter and can operate at higher speeds, making them suitable for portable applications.
- Cooling and Durability: A motor with good cooling features can prevent overheating during extended use, which is vital for maintaining performance and longevity. Additionally, look for motors built with durable materials that can withstand the rigors of a workshop environment.
- Cost: Finally, consider your budget when selecting a motor. While it may be tempting to opt for the cheapest option, investing in a quality motor can pay off in the long run with better performance and reliability.
Why Is the Frame Material Crucial for Stability?
The choice of frame material is pivotal for the stability and effectiveness of a homemade drill press. A robust frame contributes significantly to minimizing vibrations and ensuring precise drilling angles. Here are key considerations regarding frame materials:
-
Steel: Known for its strength and durability, steel provides exceptional stability and withstands heavy use. It’s less prone to flexing under pressure compared to lighter materials.
-
Aluminum: While lighter than steel, aluminum can still be a strong option if appropriately designed. It’s easier to work with and can reduce overall weight, but may require additional bracing to maintain rigidity.
-
Wood: Often used in DIY projects, wood can be a cost-effective option. However, it lacks the durability of metal; therefore, careful selection of dense hardwoods or plywood is necessary to mitigate potential flexing.
-
Composite Materials: These can combine the benefits of strength and reduced weight. However, they may not be as widely available or familiar to all builders.
In summary, selecting the correct frame material influences the drill press’s performance, ensuring accuracy, longevity, and user satisfaction during projects.
What Benefits Can You Expect from a Custom-Built Drill Press?
A custom-built drill press offers several advantages for hobbyists and professionals alike, enhancing both functionality and efficiency.
- Precision: A custom-built drill press allows for meticulous adjustments and fine-tuning to achieve precise drilling depths and angles.
- Cost-Effectiveness: Building your own drill press can be more economical than purchasing a commercial model, especially if you already have some materials on hand.
- Customization: You can tailor the design to fit your specific needs, such as the size of the work area or the type of materials you frequently work with.
- Quality Control: By building your own drill press, you can ensure the quality of materials used, leading to a more durable and reliable tool.
- Learning Experience: The process of designing and constructing a drill press enhances your skills in woodworking, mechanics, and engineering.
The precision of a custom-built drill press is unparalleled, as it enables users to make detailed adjustments for various drilling tasks. Whether it is setting the exact depth or adjusting the angle of the drill bit, this level of control can significantly improve the quality of work produced.
Cost-effectiveness is another significant benefit of a homemade drill press. Instead of spending a large sum on a commercial model, you can utilize leftover materials and components, which can lead to substantial savings while still achieving a functional tool.
Customization is perhaps one of the most appealing aspects of building your own drill press. You have the freedom to design the machine to suit your specific projects, whether you require a larger work area for bigger pieces or specialized features for unique applications.
Quality control is crucial when it comes to tools, and constructing your own drill press ensures that you are using high-quality materials that meet your standards. This can result in a more robust and long-lasting tool that can withstand regular use without compromising performance.
Lastly, the learning experience involved in building a custom drill press cannot be overlooked. It challenges you to engage with mechanics and engineering principles, enhancing your knowledge and skills in creating functional tools for your workshop.
In What Ways Does Customization Enhance Your Work Efficiency?
Customization can significantly enhance work efficiency in various ways, particularly when it comes to tools like a homemade drill press.
- Tailored Features: Customization allows you to incorporate features that specifically meet your needs, such as adjustable speed settings or specific drill bit sizes. This tailored approach ensures that the drill press can handle diverse projects with ease, reducing the time spent adjusting settings or switching tools.
- Space Optimization: Creating a homemade drill press lets you design it to fit perfectly within your workspace. This optimization means you can work more efficiently without wasting time navigating around bulky equipment or cluttered spaces.
- Enhanced Safety: By customizing safety features, such as guards or emergency shut-off mechanisms, you can create a safer working environment. This focus on safety allows you to concentrate on your tasks without the constant worry of accidents, ultimately boosting productivity.
- Cost-Effectiveness: Building your own drill press can be more economical than purchasing a commercial model. By customizing materials and components, you can save money while still achieving a high level of functionality that meets your specific requirements.
- Personal Skill Development: The process of customizing and building a drill press enhances your skills in woodworking, engineering, or mechanics. This hands-on experience not only increases your confidence but also enables you to tackle more complex projects efficiently.
What Steps Should You Follow to Successfully Build a Homemade Drill Press?
Building a homemade drill press involves several essential steps to ensure functionality and safety.
- Design Your Drill Press: Begin by sketching a design that outlines the dimensions and features you want in your drill press. Consider the materials you have available and the type of projects you’ll be using the drill press for, as this will influence the overall size and stability of the structure.
- Gather Materials: Collect all necessary materials, including a motor, a base, a column for height adjustment, and a drill chuck. Common materials include wood for the base, metal for the column, and an old electric motor that can provide the necessary power for drilling.
- Build the Base: Construct a stable base that will support the entire drill press. This base should be heavy enough to prevent tipping during use and large enough to accommodate the workpieces you plan to drill.
- Install the Column: Secure a vertical column to the base that will support the drill motor and allow for height adjustments. Ensure that the column is perfectly vertical to maintain accuracy while drilling, and consider using a sliding mechanism for ease of adjustment.
- Attach the Motor: Mount the motor at the top of the column, ensuring that it is firmly secured. The motor should be aligned with the drill bit to ensure that it operates smoothly and effectively, providing a direct drive to the bit.
- Connect the Drill Chuck: Attach the drill chuck to the motor shaft, ensuring that it is properly tightened and aligned. This component is critical as it holds the drill bit in place, so check for any wobbling or misalignment before proceeding.
- Set Up the Worktable: Create a worktable that is adjustable and provides support for the material being drilled. A flat and sturdy surface is essential for accurate drilling, and you may want to include clamps to secure the workpiece.
- Wire the Electrical Components: Safely wire the motor to a power source, ensuring all connections are secure and insulated. If you’re not familiar with electrical work, consider consulting an expert to avoid hazards during operation.
- Test the Drill Press: Before using the drill press for actual projects, conduct tests to ensure everything operates correctly. Check for stability, motor function, and the precision of the drill bit alignment.
- Make Adjustments and Safety Features: After testing, make any necessary adjustments to enhance the performance and safety of your drill press. Consider adding safety guards and emergency shut-off switches to prevent accidents during use.
How Do You Ensure Safety While Assembling Your Drill Press?
Ensuring safety while assembling your drill press is crucial to prevent accidents and injuries.
- Wear Personal Protective Equipment (PPE): Always wear safety goggles, gloves, and a dust mask to protect yourself from debris and harmful dust particles.
- Work in a Well-Ventilated Area: Make sure your assembly area is well-ventilated to avoid inhaling any fumes or dust generated during the process.
- Use Proper Tools: Utilize the correct tools for assembly to ensure that you can securely fasten all components without slipping or damaging parts.
- Check Electrical Safety: Before connecting your drill press to a power source, inspect all electrical components for any frayed wires or other signs of wear.
- Stabilize the Drill Press: Ensure that the drill press is securely mounted or stabilized to prevent tipping or movement during operation.
- Read the Manual: Always read the manufacturer’s instructions carefully to understand the specific safety precautions related to your drill press model.
- Keep the Workspace Organized: Maintain a clean and organized workspace to reduce the risk of accidents caused by tripping over tools or materials.
Wearing personal protective equipment (PPE) like safety goggles, gloves, and a dust mask is essential to shield yourself from flying debris and hazardous materials that may be present during assembly.
Working in a well-ventilated area helps ensure that any harmful fumes or dust are adequately dispersed, reducing the risk of respiratory issues while you assemble your drill press.
Using proper tools is vital for effective assembly; using the right tools minimizes the risk of damaging components or injuring yourself due to slipping or mishandling.
Before connecting the drill press to a power source, checking electrical safety by inspecting wires and connections helps prevent electrical hazards that could lead to shocks or fires.
Stabilizing the drill press is crucial; ensuring that it is mounted securely will prevent it from tipping over or moving unexpectedly, which can lead to serious injuries.
Reading the manual provides important safety guidelines specific to your drill press model, ensuring that you are aware of any unique requirements or warnings.
Keeping your workspace organized reduces the likelihood of mishaps; a clutter-free environment helps you maintain focus and prevents accidents caused by tripping or losing track of tools.
What Common Mistakes Should You Avoid During Construction?
When constructing a homemade drill press, it’s crucial to avoid certain common mistakes to ensure functionality and safety.
- Inadequate Planning: Failing to create a detailed plan can lead to confusion and mistakes during construction. A thorough design should include measurements and material lists to avoid costly errors.
- Poor Material Selection: Using low-quality or inappropriate materials can compromise the stability and durability of your drill press. It’s essential to choose robust materials that can withstand the forces generated during drilling.
- Neglecting Safety Features: Omitting safety features such as guards or emergency shut-off switches can lead to accidents. Including these elements is vital for protecting yourself and bystanders during operation.
- Improper Assembly: Assembling parts incorrectly can result in misalignment and inefficient operation. Paying close attention to alignment and securing all components properly is necessary for optimal performance.
- Ignoring Power Requirements: Failing to match the drill press’s motor with the power supply can lead to electrical issues or reduced performance. It’s important to ensure that the motor is compatible with the available power source to avoid malfunctions.
- Neglecting Vibration Control: Ignoring vibration dampening can lead to inaccuracies in drilling and potential damage to the workpiece. Implementing vibration control measures, such as stabilizing the base, is essential for precision work.
- Overlooking Maintenance: Failing to plan for regular maintenance can result in deterioration over time. Establishing a routine for checking and maintaining the drill press ensures longevity and consistent performance.
Where Can You Find Reliable Resources for Building Your Drill Press?
Reliable resources for building your drill press can be found in various formats and sources.
- DIY Websites: Websites like Instructables and DIY Network offer step-by-step guides and user-contributed projects that can provide valuable insights and instructions for building your own drill press.
- YouTube Tutorials: Many skilled craftsmen share their drill press builds on YouTube, offering visual demonstrations, tips, and tricks that can enhance your understanding of the construction process.
- Woodworking Forums: Online forums such as LumberJocks or Reddit’s r/Woodworking allow you to connect with experienced woodworkers who can share their personal projects, answer questions, and provide feedback on your plans.
- Books and eBooks: There are numerous books available that focus on woodworking and tool construction, providing detailed plans, material lists, and safety tips that are essential for building a reliable drill press.
- Local Workshops or Maker Spaces: Participating in local workshops or visiting maker spaces can give you hands-on experience and access to knowledgeable instructors who can guide you through the process of building your drill press.
DIY websites compile a wealth of user-generated content, often including detailed instructions, material lists, and photos that illustrate each step of the project. This can be particularly helpful for visual learners and those seeking inspiration from various designs.
YouTube tutorials provide a dynamic learning experience, as you can see the entire assembly process in real-time. This format allows you to pause, rewind, and follow along at your own pace, making it easier to grasp complex concepts and techniques.
Woodworking forums are a treasure trove of collective knowledge where enthusiasts share their successes and challenges. Engaging in discussions can provide you with new ideas, troubleshooting advice, and recommendations for materials and tools.
Books and eBooks often delve deeper into the theory and techniques behind woodworking projects. They can serve as comprehensive guides that not only cover building a drill press but also include broader topics related to woodworking safety and tool maintenance.
Local workshops and maker spaces offer the benefit of hands-on experience, allowing you to work alongside others who share your interests. These environments often provide access to tools and materials that you may not have at home, making it easier to experiment and learn.
Related Post: