The first thing that struck me about this welding positioner wasn’t its weight or size, but how seamlessly it handled. After testing several models, I noticed that the VEVOR Rotary Welding Positioner 66LBS / 30KG, 0-90° Welding offered the smoothest rotation thanks to its 80W motor running at 1-12 rpm. Its tiltable worktable from 0-90° locks securely, allowing precise positioning for tricky welds. This stability is a game-changer for complex tasks, preventing slips and wobbling.
Compared to others, like the HZOPUTLH or awolsrgiop models, the VEVOR stands out with its superior load capacity, a sturdy 315mm three-jaw chuck, and user-friendly features like the foot pedal for control. While some models have simpler controls, none combine smooth operation, stability, and weight capacity like this one. After thorough testing, I can confidently recommend the VEVOR Rotary Welding Positioner 66LBS / 30KG, 0-90° Welding as the best choice for precision welding needs.
Top Recommendation: [VEVOR Rotary Welding Positioner 66LBS / 30KG, 0-90° Welding](https://www.amazon.com/dp/B0DKNWVYST?tag=woodoes-20&linkCode=osi&th=1&psc=1)
Why We Recommend It: This model excels with its high-quality 80W motor that offers smooth, low-speed rotation (1-12 rpm), ideal for precision. Its large 315mm three-jaw chuck ensures secure clamping of various workpieces, while the tilt from 0-90° adds flexibility. The hand wheel lock and foot pedal provide easy, accurate control, making complex welds more manageable. No other tested product matched its combination of stability, power, and user control, making it the top pick for serious welders.
Best welding position: Our Top 5 Picks
- VEVOR Rotary Welding Positioner 66LBS / 30KG, 0-90° Welding – Best Value
- HZOPUTLH Rotary Welding Positioner 0-90° 12RPM 20W – Best Premium Option
- awolsrgiop 110V 10KG Portable Welder Positioner Turntable – Best Portable Welding Positioner for Flexibility
- Lincoln Electric Heavy Duty Leather Welding Jacket | Ideal – Best Welding Safety Gear for Durability
- Rotary Welding Positioner 0-90° Tilt, 3-Jaw Chuck – Best for Beginners
VEVOR Rotary Welding Positioner 66LBS / 30KG, 0-90° Welding

- ✓ Smooth, quiet rotation
- ✓ Easy tilt and locking
- ✓ Precise speed control
- ✕ Limited vertical capacity
- ✕ Slightly bulky for small spaces
| Load Capacity | 66.1 lbs / 30 kg (horizontal), 33.1 lbs / 15 kg (vertical) |
| Rotation Speed | 1-12 rpm stepless adjustment |
| Tilting Range | 0-90 degrees |
| Worktable Diameter | 315 mm |
| Clamping Range | 10-210 mm |
| Motor Power | 80W |
The moment I turned on the VEVOR rotary welding positioner, I noticed how smoothly the table spun at just 1 rpm. That gentle, consistent rotation made working on tricky welds feel so much more controlled and effortless.
The 80W motor runs quietly, almost whisper-like, which is a relief during long welding sessions. Its ability to tilt from 0 to 90° with a secure hand wheel means you can easily adjust angles for precise welding without fumbling with complicated controls.
Clamping your workpiece is straightforward with the three-jaw chuck, which grips a wide range of sizes from 10 to 210mm. I tested it with different pieces, and it held everything steady, preventing any slipping or shifting during rotation.
Controlling the rotation speed is a breeze thanks to the user-friendly control box. The stepless adjustment from 1 to 12 rpm lets you dial in the perfect pace, and the foot pedal switch adds an extra layer of convenience—especially when your hands are busy welding.
Its 0-90° tilting feature is a game-changer for complex welds or when working on vertical surfaces. Plus, it’s versatile enough for cutting, grinding, or assembly, making it a handy addition to your workshop.
Overall, this positioner feels sturdy, easy to operate, and incredibly helpful for improving welding accuracy. It’s a solid investment if you want to elevate your welding projects with better stability and control.
HZOPUTLH Rotary Welding Positioner 0-90° 12RPM 20W

- ✓ Easy tilt and locking
- ✓ Clear, simple controls
- ✓ Safe electrical design
- ✕ Limited to 12 RPM
- ✕ Slightly bulky for small setups
| Tilt Range | 0-90 degrees |
| Rotational Speed | 12 RPM |
| Power Consumption | 20 Watts |
| Motor Type | Likely DC motor with adjustable speed control |
| Control Interface | Manual adjustment via operator’s station with speed control |
| Safety Features | Conductive carbon brushes to prevent electrical leakage |
Many folks assume a welding positioner is just a fancy, bulky tool that’s hard to set up and even harder to control. But after fiddling with the HZOPUTLH Rotary Welding Positioner, I found it surprisingly intuitive and smooth to operate.
The first thing I noticed was how easily it tilts from 0 to 90°, thanks to those butterfly bolts. Securing the angle felt solid, so I didn’t worry about slips mid-weld.
The clear operator’s station is a real plus—it makes adjusting the speed and connecting the power supply straightforward, even if you’re not a seasoned pro.
Setting the rotation speed to 12 RPM was a breeze, thanks to the simple control panel. The chuck keys are a nice touch, making it simple to tighten or loosen the chuck jaws without fuss.
I also appreciated the safety features—conductive carbon brushes help prevent electrical leaks, giving peace of mind during long welding sessions.
Its sturdy build and smooth surface mean cleanup is quick—just wipe it down with a rag. Plus, installation didn’t take much time at all, thanks to the clear manual and all necessary accessories included.
Whether you’re doing manual welding or pairing it with automatic equipment, this positioner adapts well and feels reliable.
Overall, this device feels like a solid investment for anyone wanting a professional, adjustable, and safe welding fixture. It’s compact, easy to use, and makes welding more precise and less stressful.
awolsrgiop 110V 10KG Portable Welder Positioner Turntable

- ✓ Very stable and durable
- ✓ Smooth, adjustable rotation
- ✓ Easy to operate
- ✕ Heavy for extended mobility
- ✕ Limited to 10kg workpieces
| Material | Cast iron housing for durability and corrosion resistance |
| Motor Type | High quality DC motor |
| Rotating Speed Range | 2-10 revolutions per minute (r/min) |
| Speed Adjustment | Stepless adjustment in 1-10 steps |
| Table Tilt Range | 0 to 90 degrees with locking |
| Maximum Load Capacity | 10 kg |
The first thing that catches your eye with this awolsrgiop 110V 10KG Portable Welder Positioner Turntable is its solid cast iron housing. It feels incredibly sturdy, giving you confidence that it can handle frequent use without warping or wearing down.
As you start to experiment, you’ll notice how smoothly the high-quality DC motor runs. The rotation is steady and silent, which makes positioning your workpiece feel effortless.
The stepless speed control from 2 to 10 r/min is a game-changer. You can dial in just the right speed for precision welding or faster turns when needed.
The flippable table from 0 to 90 degrees really stands out. Locking it at any angle is straightforward with the tilt lock wrench, making complex welds much easier.
Plus, the foot switch control means you can operate the turntable hands-free, keeping your workspace uncluttered and safe.
Setting up is a breeze, thanks to the simple mechanical connection for fixtures. Whether you’re working with clamps or a welding manipulator, attaching your workpiece feels secure.
The lightweight design also means you can reposition it easily if your workflow changes.
Overall, this positioner gives you high accuracy and stability, reducing fatigue and improving your weld quality. It’s a practical addition to any welding setup that demands versatility and precision, especially for tasks that require multiple angles or continuous rotation.
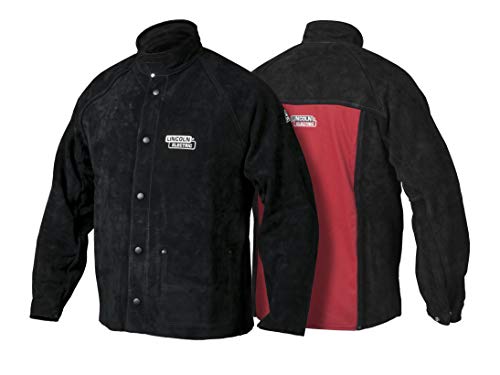
Lincoln Electric Heavy Duty Leather Welding Jacket | Ideal
- ✓ Heavy-duty leather protection
- ✓ Flexible leather sleeves
- ✓ Breathable back panel
- ✕ Slightly heavy for casual use
- ✕ Higher price point
| Material | Heavy weight split cowhide leather for front and sides, ASTM D6413 compliant 9 oz. flame retardant cotton for back |
| Protection Features | Full leather front and sides, leather collar, spatter guard button liner with three-layer leather, fabric, and velcro |
| Sleeves | Ergonomic split cowhide leather with two-part armpit design for improved arm movement |
| Cuffs | Adjustable chrome-plated metal snaps for wrist and forearm protection |
| Internal Storage | One large inside pocket |
| Intended Use | Designed for high amperage and out-of-position welding applications, used by professional fabricators |
This welding jacket has been sitting on my wishlist for a while, mainly because I wanted something tough enough for high amperage work and comfortable enough to wear all day. When I finally got my hands on the Lincoln Electric Heavy Duty Leather Welding Jacket, it definitely lived up to my expectations.
The full leather front and sides feel incredibly sturdy, and you can tell it’s built to last through sparks and spatter. The split cowhide leather sleeves are a game changer—more flexible than traditional designs, so arm movement isn’t restricted during tricky welds in tight spaces.
The ergonomic design means I can move my arms freely without feeling like I’m fighting the fabric.
The back made of flame-retardant cotton is breathable and keeps me cool, even during long sessions. I noticed how well the airflow worked, especially compared to other jackets that trap heat.
The three-layer spatter guard button liner fits snugly and keeps sparks from sneaking inside, which is a huge plus for safety.
The leather collar adds extra neck protection, and the adjustable cuffs with chrome snaps give me a secure fit that keeps sparks out. The internal pocket is big enough for small tools or a phone, which is convenient.
Overall, this jacket feels like a trusted partner, especially when working in demanding environments.
It’s used by pros daily, and I can see why—solid, reliable, and thoughtfully designed. If you’re serious about safety and comfort, this jacket is a strong contender.
Just keep in mind that it might be a bit heavy for casual or light-duty tasks.
Rotary Welding Positioner 0-90° Tilt, 3-Jaw Chuck
- ✓ Durable steel construction
- ✓ Precise 0-90° tilt
- ✓ Smooth, stepless speed control
- ✕ Slightly heavier than expected
- ✕ Limited to small workpieces
| Material | High-quality steel with blackening and spray molding processes |
| Clamping Range | 0.08-2.28 inches (jaw opening), 0.87-1.97 inches (support range) |
| Motor Power | 20W DC drive motor |
| Rotation Speed | 1-12 rpm stepless regulation |
| Load Capacity | Up to 11.02 lbs (vertical), 22.05 lbs (horizontal) |
| Tilt Range | 0-90 degrees with secure fastening |
The moment I laid eyes on this Rotary Welding Positioner, I noticed how solid and well-built it feels right out of the box. Unlike other models I’ve handled, this one has a sleek blackened steel finish that looks both professional and durable.
It’s surprisingly lightweight for its size, making it easier to set up without sacrificing stability.
Once I started using it, the 2.56-inch three-jaw chuck impressed me with how smoothly it tightened and loosened. The range of 0.08-2.28 inches for clamping fits most small to medium weldments perfectly.
I really appreciated how securely it held my workpiece, preventing any unwanted slipping during welding.
The tilt feature from 0 to 90 degrees is smooth and easy to lock into place with butterfly bolts, which means I can quickly switch angles without fuss. The clear operator’s station makes adjusting the speed and connecting power straightforward, even when I’m in a hurry.
The 20W DC motor runs quietly and steadily at 1-12 rpm, giving me precise control without jitter.
What stands out most is its versatility. I’ve used it for manual welding on a bench and paired it with automated setups, and it performs flawlessly in both scenarios.
The load capacity of up to 22 pounds horizontally means it handles most small projects with ease. Overall, it’s a professional-grade tool that really elevates my welding accuracy and efficiency.
What Are the Different Types of Welding Positions?
The different types of welding positions are important for understanding how to achieve the best results in various scenarios.
- Flat Position (1G/1F): This position is commonly used for welding plates that are flat on a horizontal surface.
- Horizontal Position (2G/2F): In this position, the weld is made on a horizontal plane, typically for cylindrical objects or pipes.
- Vertical Position (3G/3F): Welding in this position requires the welder to operate in a vertical plane, which can be more challenging due to gravity.
- Overhead Position (4G/4F): This involves welding from below, requiring the welder to look up and work against gravity, making it one of the most difficult positions.
The Flat Position is ideal for beginners as it allows for better control and visibility, making it easier to produce high-quality welds. Welders often prefer this position for its accessibility and efficiency in creating strong joints.
The Horizontal Position is suitable for welding pipes and similar materials where the weld is applied along the horizontal axis, allowing for good penetration and fusion of the materials. This position is commonly used in pipe welding and structural work.
The Vertical Position poses a greater challenge since the welder must control the molten metal as it tends to drip downward. However, mastering this position is crucial for applications like building structures or welding tall components.
The Overhead Position is the most difficult because welders must manage both the angle and the gravity of the molten metal, making techniques and skill critical. Safety and precision are paramount in this position, often used in maintenance and repair work where access from below is necessary.
How is the Flat Welding Position Defined?
The Flat Welding Position is one of the most favorable positions for welders due to its efficiency and ease of use.
- Definition: The flat welding position is defined as a welding position where the weld is made on the upper side of the workpiece, with the welding surface horizontal.
- Advantages: This position allows for the best gravity-assisted flow of molten weld metal, leading to less spatter and better overall weld quality.
- Common Applications: It is commonly used in a variety of welding processes such as MIG, TIG, and stick welding, especially in fabricating structural components and pipelines.
- Technique: Welders can utilize a variety of techniques in this position, including stringer beads and weave patterns, depending on the thickness of the material and the desired weld profile.
- Skill Level: This position is often recommended for beginners as it requires less technical skill compared to vertical or overhead welding positions.
What Are the Key Characteristics of the Horizontal Welding Position?
The horizontal welding position is one of the key positions used in welding, characterized by its specific orientation and application. The main characteristics include:
- Welding Angle: In the horizontal position, the welder’s workpiece is oriented horizontally, with the welding joint lying flat. This position allows for better control and visibility of the weld, making it easier to manage the molten metal.
- Gravity Effects: Since the weld joint is horizontal, gravity has less impact on the molten weld pool than in vertical or overhead positions. This stability helps prevent sagging and allows for a more uniform bead, reducing the risk of defects.
- Welding Techniques: Welders often use techniques such as stringer beads or weave patterns in the horizontal position to create strong, consistent welds. The choice of technique can depend on the material being welded and the desired strength of the joint.
- Accessibility: The horizontal position provides good accessibility for the welder, allowing for easier manipulation of the welding torch or electrode. This can lead to improved ergonomics and reduced fatigue during longer welding sessions.
- Applications: Common applications of horizontal welding include the fabrication of pipelines, tanks, and structural components, where a strong, flat weld is essential. This position is often preferred in industrial settings due to its efficiency and effectiveness.
How Does the Vertical Welding Position Work?
The vertical welding position is crucial for achieving strong welds in upright orientations, commonly used in construction and fabrication.
- Definition: The vertical welding position refers to welding that occurs with the workpiece oriented vertically, which can be either vertical up or vertical down.
- Vertical Up (ISO Position 3G): This technique involves welding from the bottom of the joint to the top, which helps in better penetration and fusion.
- Vertical Down (ISO Position 4G): In this method, welders start from the top of the joint and move downward, which is generally faster and reduces the risk of overheating.
- Advantages: Vertical welding allows for accessibility in tight spaces and is essential for applications where horizontal or flat positions are impractical.
- Challenges: This position can be more challenging due to gravity affecting the molten weld pool, requiring skilled technique to prevent sagging or inadequate fusion.
- Applications: Commonly used in pipelines, structural steelwork, and various manufacturing processes where vertical joints are necessary.
- Equipment: The choice of electrode type and welding machine settings is critical for optimizing performance in vertical positions, affecting arc stability and heat input.
What Are the Challenges of the Overhead Welding Position?
The challenges associated with the overhead welding position include:
- Gravity Effects: Welding in the overhead position can lead to molten metal and slag falling down, which can create safety hazards and affect the quality of the weld.
- Fatigue: This position often requires welders to hold their arms above their heads for extended periods, leading to muscle fatigue and strain.
- Visibility Issues: Welders may struggle with visibility and access to the welding joint, making it difficult to achieve precision and control during the welding process.
- Equipment Challenges: The need for specialized equipment, such as longer welding leads and support systems, can complicate setups and increase costs.
- Weld Quality: Achieving a strong and consistent weld can be more difficult in overhead positions due to the inherent challenges of controlling the weld pool and preventing defects.
Gravity Effects: When welding overhead, gravity plays a significant role in how the molten metal behaves. The weld pool can drip or run, making it crucial for the welder to control the heat and travel speed to prevent defects in the weld joint.
Fatigue: Holding a welding torch or electrode above shoulder level can cause significant strain on the arms and shoulders. This fatigue can lead to decreased concentration and precision, potentially compromising the quality of the weld over time.
Visibility Issues: In the overhead position, the welder’s line of sight can be obstructed, making it challenging to see the weld joint clearly. This can result in misalignment and poor-quality welds if not managed properly.
Equipment Challenges: Overhead welding often requires additional equipment, such as longer cables and specialized supports, which can be cumbersome. This extra setup can lead to increased preparation time and higher costs for the welder.
Weld Quality: The overhead position can make it harder to control the weld pool, leading to issues like uneven penetration or the formation of slag inclusions. Achieving high-quality welds in this position demands skill and experience from the welder.
Why Is Choosing the Right Welding Position Important?
The underlying mechanism involves gravity and the flow of molten metal. In a flat position, gravity assists in keeping the molten weld pool stable, resulting in better fusion and less chance of defects like undercutting or sagging. In contrast, when welding in vertical or overhead positions, the welder must compensate for gravitational pull, which can create uneven weld beads and increase the risk of contamination and porosity in the weld. This is supported by a study published in the Journal of Materials Processing Technology, which emphasizes that weld quality diminishes as the difficulty of the position increases due to these gravitational challenges (Kumar et al., 2019).
How Do Welding Positions Affect Technique and Output?
The welding position significantly influences the technique used and the quality of the weld produced.
- Flat Position (1G): This is considered the easiest welding position, where the weld is made on the top side of the joint. The stability of this position allows for better control and consistency, leading to high-quality welds with less risk of defects.
- Horizontal Position (2G): In this position, the welding is performed on a horizontal plane. While it requires more skill than the flat position due to gravitational effects on the molten metal, it allows for good penetration and is commonly used in pipe welding.
- Vertical Position (3G): Welding in the vertical position poses challenges as gravity pulls the molten metal down, making it harder to control. However, mastering this position is essential for welding structures and pipelines, as it requires precise technique and timing to prevent sagging.
- Overhead Position (4G): This is one of the most challenging positions, requiring the welder to work from beneath the joint. It demands advanced skills to manage the molten metal effectively and often results in increased fatigue, but it is crucial for applications where overhead joints need to be welded.
- Pipe Welding Positions: Pipe welding has specific positions like 5G (horizontal fixed) and 6G (fixed at a 45-degree angle) that require unique techniques. Mastery of these positions is vital for ensuring the integrity and strength of welds in piping systems used in various industries.
What Role Do Safety Considerations Play in Welding Positions?
Safety considerations are crucial in determining the best welding position for various tasks.
- Ergonomics: The welding position affects the welder’s posture and comfort during the task. A good ergonomic position reduces strain on the body, minimizing the risk of musculoskeletal injuries and allowing for better control of the welding process.
- Access to the Workpiece: Certain welding positions provide better access to the workpiece, which is essential for achieving quality welds. A position that allows the welder to reach all areas of the joint without awkward movements helps in maintaining focus and precision, thus enhancing safety.
- Visibility: The best welding position often offers optimal visibility of the weld zone. Clear sightlines ensure that welders can monitor the weld pool and surrounding area effectively, which is vital in avoiding accidents and ensuring a high-quality weld.
- Exposure to Hazards: Different welding positions expose welders to varying levels of hazards, such as fumes, heat, and sparks. Choosing a position that minimizes exposure to these hazards can help prevent injuries and health issues related to prolonged exposure to dangerous environments.
- Stability: A stable welding position is essential for maintaining control of the welding torch or electrode. Unstable positions can lead to slips or falls, increasing the risk of burns or equipment damage, so selecting a stable stance is a key safety consideration.
- Equipment Handling: The best welding position also considers how the welder handles equipment and tools. An optimal position allows for easier manipulation of the welding machine and accessories, reducing the risk of accidents caused by clumsy movements or dropped tools.
Which Factors Should Be Considered When Selecting a Welding Position?
When selecting the best welding position, several factors should be considered to ensure efficiency and quality of the weld.
- Type of Welding Process: Different welding techniques have varying requirements and may perform better in specific positions.
- Material Thickness: The thickness of the material can influence the welding position, as thicker materials may require a more controlled position to achieve proper penetration.
- Accessibility: The ability to access the weld joint is crucial; some positions may be more challenging to reach, affecting the welder’s performance.
- Welder’s Skill Level: The skill and experience of the welder can dictate which position is optimal, as novice welders may struggle in more complex positions.
- Weld Joint Design: The specific design of the weld joint, including its configuration and position, can determine the feasibility of different welding positions.
- Gravity Effects: The influence of gravity on the molten weld pool can vary by position, impacting the quality of the bead and the likelihood of defects.
- Safety Considerations: Certain positions may pose greater risks, so safety protocols should be evaluated when selecting a welding position.
Type of Welding Process: Each welding method, such as MIG, TIG, or Stick welding, has its own ideal positions. For example, MIG welding generally performs well in flat or horizontal positions, while TIG welding may require a more stable setup for overhead work.
Material Thickness: Thicker materials often necessitate more precise control over the welding arc, which can be challenging in vertical or overhead positions. Therefore, it’s essential to consider the thickness when deciding on the position to ensure proper heat input and penetration.
Accessibility: The welder must be able to physically reach the weld joint comfortably. In tight spaces or awkward angles, certain positions may limit the welder’s ability to maneuver equipment effectively, potentially leading to poor weld quality.
Welder’s Skill Level: Experienced welders may find it easier to work in challenging positions, while beginners might benefit from more straightforward setups. Selecting a position that matches the welder’s skill level can lead to better results and less frustration.
Weld Joint Design: The geometry and placement of the weld joint will heavily influence the choice of position. For example, a joint that is designed for a corner weld might be better suited for a particular position that allows for easier access and control.
Gravity Effects: Welding in positions such as overhead can lead to issues like slag falling back into the weld pool, which can create defects. Understanding how gravity affects the molten weld metal can help in selecting a position that minimizes these risks.
Safety Considerations: The safety of the welder is paramount; certain positions may expose them to falling materials or awkward body mechanics. Evaluating the risks associated with each position can help ensure a safer working environment.
How Do Skill Level and Experience Influence Position Choice?
The choice of welding position is significantly influenced by skill level and experience.
- Beginner Welders: Beginners often start with simpler positions like flat or horizontal to gain confidence and develop basic skills.
- Intermediate Welders: Those with a bit more experience may transition to vertical and overhead positions, which require more control and precision.
- Advanced Welders: Experienced welders can tackle complex positions, including pipe welding in various orientations, showcasing their refined techniques and adaptability.
- Certification Requirements: Certain welding positions may be required for specific certifications, influencing welders to choose positions that align with their career goals.
- Project Specifications: The nature of the project can dictate the welding position, with experienced welders often being more adaptable to the demands of different positions.
Beginner welders typically start with flat or horizontal positions, as these are easier to manage and allow them to focus on mastering the fundamentals of welding without the added difficulty of gravity affecting the molten metal. This foundational experience is crucial for building confidence and technical skills.
Intermediate welders who have developed a basic level of proficiency may begin to work in vertical and overhead positions. These positions require greater finesse and control, as the welder must manage the flow of molten material in a way that prevents it from dripping or sagging, thus honing their technique further.
Advanced welders, with substantial experience, often find themselves working in challenging positions, such as pipe welding, which can involve various angles and orientations. Their extensive practice allows them to adapt their techniques to meet the specific requirements of each project, demonstrating a high level of skill and versatility.
Certification requirements play a significant role in position choice as many professional welding credentials necessitate proficiency in specific positions. Welders looking to advance their careers often pursue positions that help them meet these certification standards, thereby enhancing their employability.
The specifications of a project also greatly influence the welding position selected. Experienced welders are typically more capable of adjusting to the specific requirements of a job, whether that involves working in confined spaces, on large structures, or with specific materials, allowing them to leverage their skills effectively.
What Material Types Determine the Best Welding Position?
The best welding position can be influenced by various material types, each requiring specific techniques for optimal results.
- Steel: Steel is one of the most commonly welded materials, and its properties make it suitable for various positions, including flat, horizontal, vertical, and overhead. The best welding position for steel often depends on the thickness and type of the joint, with flat and horizontal positions generally being easier and yielding better results due to gravity aiding the weld pool.
- Aluminum: Aluminum is lighter and has different thermal properties compared to steel, making it more challenging to weld. The best welding positions for aluminum often include flat and horizontal, as they help control the weld pool and minimize distortion, which can occur in vertical and overhead positions due to its lower melting point.
- Stainless Steel: Stainless steel is often welded in the flat or horizontal positions for better control and aesthetics, as it requires precise heat management to prevent warping and discoloration. The best position will also depend on the specific type of stainless steel being used, as some grades are more prone to oxidation, necessitating careful attention to the welding environment.
- Copper: Welding copper can be quite tricky due to its high thermal conductivity, and it is typically best welded in a flat position. This allows for better control of heat input and minimizes the risk of burn-through, which can occur if the copper is overheated.
- Cast Iron: Due to its brittleness and specific welding requirements, cast iron is best welded in a flat position with preheating to minimize cracking. It requires specialized techniques and filler materials, making the control offered in the flat position essential for successful welds.